-de8bd8f33c3e44a59907dafe1884f228.png)


最简结构
pipeline {
    agent any

    stages {
        stage('build') {
            steps {
                echo 'hello'
            }
        }
    }
}
pipeline:代表整条流水线,包含整条流水线的逻辑。stage部分:阶段,代表流水线的阶段。每个阶段都必须有名称。本例中,build就是此阶段的名称。stages部分:流水线中多个stage的容器。stages部分至少包含一个stage。steps部分:代表阶段中的一个或多个具体步骤(step)的容器。steps部分至少包含一个步骤,本例中,echo就是一个步骤。在一个stage中有且只有一个steps。agent部分:指定流水线的执行位置(Jenkins agent)。流水线中的每个阶段都必须在某个地方(物理机、虚拟机或 Docker 容器)执行,agent部分即指定具体在哪里执行。
以上每一个部分( section)都是必需的,少一个,Jenkins 都会报错。
步骤(step)
pipeline 基本结构决定的是 pipeline 整体流程,但是真正“做事”的还是 pipeline 中的每一个步骤。步骤是 pipeline 已经不能再拆分的最小操作。前文中,我们只看到一个步骤。echo 是指执行 echo 命令。这个步骤只是 Jenkins pipeline 内置的大量步骤中的一个。
那是不是说,Jenkins pipeline 内置了所有可能需要用到的步骤呢?显然没有必要。因为有些步骤我们可能一辈子也不会用到。
更好的设计是:步骤是可插拔的,就像 Jenkins 的插件一样。
Jenkins 就是这样做的,已经有哪些插件适配了 Jenkins pipeline呢? pipeline plugin Github 仓库给出了一个列表:
只要安装了这些适配了 Jenkins pipeline 的插件,就可以使用其提供的 pipeline 步骤。
Jenkins 官方还提供了 pipeline 步骤参考文档:
agent 部分
agent 部分描述的是整个 pipeline 或在特定阶段执行任务时所在的 agent。换句话说,Jenkins master 根据此 agent 部分决定将任务分配到哪个 agent 上执行。agent 部分必须在 pipeline 块内的顶层定义,而 stage 块内的定义是可选的。
any
文章开头的示例中的 agent 部分是这样写的:
pipeline {
    agent any
    ...
agent any 告诉 Jenkins master 任何可用的 agent 都可以执行。
agent 部分的定义可以放在阶段中,用于指定该 stage 执行时的 agent。
pipeline {
    agent any // 不能省略
    stages {
        stage('Build') {
            agent any
            steps {
                echo 'Build'
            }
        }
    }
}
注意:pipeline 块内的 agent 部分是必需的,不能省略。
label
当 pipeline 需要在 JDK8 环境下进行构建时,就需要通过标签来指定 agent。代码如下:
pipeline {
    agent {
        label 'jdk8'
    }
    ...
}
当然,前提是存在打上 jdk8 标签的节点。
事实上,上述 agent 部分其实是如下 agent 部分的缩写:
agent {
    node {
        label 'jdk8'
    }
}
有些构建任务是需要在 JDK8 及 Windows 环境下执行的。也就是说,我们需要过滤同时具有 windows 和 jdk8 标签的 agent。可以这样写:
agent {
    label 'windows' && 'jdk8'
}
使用 && 代表并且关系。
none
以上介绍的是如何分配 agent,其实还可以指定不分配 agent,写法很简单:agent none,指的是不分配任何 agent。
没有真正遇到过使用场景,可能就很难想象在什么时候使用 agent。如果希望每个 stage 都运行在指定的 agent 中,那么 pipeline 就不需要指定 agent 了。
示例如下:
pipeline {
    agent none
    stages {
        stage('Example Build') {
            agent { label 'mvn' }
            steps {
                echo 'Hello, build'
            }
        }

        stage('Example Test') {
            agent { label 'test' }
            steps {
                echo 'Hello, test'
            }
        }
    }
}
自定义工作路径
agent 部分允许我们对工作目录进行自定义。node 除了 label 选项,还提供了另一个选项 --customWorkspace,自定义工作目录,写法如下:
agent {
    node {
        label 'jdk8'
        customWorkspace '/var/lib/custom'
    }
}
customWorkspace 选项除了写绝对路径,还可以写相对于默认工作目录路径的相对路径。
post 部分
post 部分定义在 pipeline 块下与 stages 同级,它包含的是在整个 pipeline 或阶段完成后一些附加的步骤。post 部分是可选的,所以并不包含在 pipeline 最简结构中。但这并不代表它作用不大。根据 pipeline 或阶段的完成状态,post 部分分成多种条件块,包括:
always:不论当前完成状态是什么,都执行。changed:只要当前完成状态与上一次完成状态不同就执行。fixed:上一次完成状态为失败或不稳定(unstable),当前完成状态为成功时执行。regression:上一次完成状态为成功,当前完成状态为失败、不稳定或中止(aborted)时执行。aborted:当前执行结果是中止状态时(一般为人为中止)执行。failure:当前完成状态为失败时执行。success:当前完成状态为成功时执行。unstable:当前完成状态为不稳定时执行。cleanup:清理条件块。不论当前完成状态是什么,在其他所有条件块执行完成后都执行。
post 部分可以同时包含多种条件块,例:
post {
    success {
        echo 'pipeline post success'
    }

    always {
        echo 'pipeline post always'
    }

    failure {
        mail to: 'zze@exp.com', subject: 'exec failed'
    }
}
指令
指令可以被理解为对 Jenkins pipeline 基本结构的补充。
Jenkins pipeline 支持的指令有:
-
environment:用于设置环境变量,可定义在stage或pipeline部分。 -
tools:可定义在pipeline或stage部分。它会自动下载并安装我们指定的工具,并将其加入PATH变量中。 -
input:定义在stage部分,会暂停pipeline,提示你输入内容。 -
options:用于配置 Jenkins pipeline 本身的选项,比如options {retry(3)}指当 pipeline 失败时再重试 3 次。options指令可定义在stage或pipeline部分。 -
parallel:并行执行多个step。在 pipeline 插件 1.2 版本后,parallel开始支持对多个阶段进行并行执行。 -
parameters:与input不同,parameters是执行 pipeline 前传入的一些参数。 -
triggers:用于定义执行pipeline的触发器。 -
when:当满足when定义的条件时,阶段才执行。
在使用指令时,需要注意的是每个指令都有自己的“作用域”。如果指令使用的位置不正确,Jenkins 将会报错。
配置 pipeline
options 指令用于配置整个 Jenkins pipeline 本身的选项。根据具体的选项不同,可以将其放在 pipeline 块或 stage 块中。
接下来我们介绍常用的几个选项。
buildDiscrder:保存最近构建记录的数量。当 pipeline 执行完成后。会在硬盘上保存制品和构建执行日志,如果长时间不清理会占用大量空间,设置此选顶后会自动清理。此选项只能在pipeline下的options中使用,例:
options {
    buildDiscarder(logRotator(numToKeepStr: '10', daysToKeepStr: '3'))
}
checkoutToSubdirectory:Jenkins 从版本控制库拉取源码时,默认检出到工作空间的根目录中,此选项可以指定检出到工作空间的子目录中。示例如下:
options {
    checkoutToSubdirectory('subdir')
}
disableConcurrentBuilds:同一个 pipeline,Jenkins 默认是可以同时执行多次的。此选项是为了禁止 pipeline 同时执行。示例如下:
options {
    disableConcurrentBuilds()
}
newContainerPerStage当agent为 docker 时,指定在同一个 Jenkins 节点上,每个stage都分别运行在一个新的容器中,而不是所有stage都运行在同一个容器中。
options {
    newContainerPerStage()
}
retry:当发生失败时进行重试,可以指定整个 pipeline 的重试次数,需要注意的是,这个次数是指总次数,包括第 1 次失败,以下例子总共会执行 4 次。当使用retry这项时,options可以被放在stage块中。
options {
    retry(4)
}
timeout:如果 pipeline 执行时间过长,超出了我们设置的timeout时间,Jenkins 将中止 pipeline。以下例子中以小时为单位,还可以SECONDS(秒)、MINUTES(分钟)为单位。当使用timeout选项时,options可以被放在stage块中。
options {
    timeout(time: 10, unit: 'HOURS')
}
使用脚本
Jenkins pipeline 专门提供了一个 script 步骤,你能在 script 步骤中像写 Groovy 代码一样写 pipeline 逻辑。比如分别在不同的浏览器上跑测试:
pipeline {
    agent any

    stages {
        stage('Example') {
            steps {
                script {
                    def browsers = ['chrome', 'firefox']
                    for (int i = 0; i < browsers.size(); ++i) {
                        echo "Testing the ${browsers[i]} browser"
                    }
                }
            }
        }
    }
}
可以看出,在 script 块中的其实就是 Groovy 代码。大多数时候,我们是不需要使用 script 步骤的。如果在 script 步骤中写了大量的逻辑则说明你应该把这些逻辑拆分到不同的阶段,或者放到共享库中。共享库是一种扩展 Jenkins pipeline 的技术,大部分时候我们都不会用到,这里就不多说。
另外,你可能已经注意到,这样串行的测试方法是低效的,而应该在不同的浏览器上并行跑测试。
内置基础步骤
文件目录相关
deleteDir:删除当前目录,deleteDir是一个无参步骤,删除的是当前工作目录。通常它与dir步骤一起使用,用于删除指定目录下的内容。dir:切换到目录,默认 pipeline 工作在工作空间目录下,dir步骤可以让我们切换到其他目录。使用方法如下:
dir('/var/logs') {
    deleteDir()
}
-
fileExists:判断文件是否存在,fileExists('/tmp/a.jar')判断/tmp/a.jar文件是否存在。如果参数是相对路径,则判断在相对当前工作目录下该文件是否存在,结果返回布尔类型。 -
isUnix:判断是否为类 UNIX 系统,如果当前 pipeline 运行在一个类 UNIX 系统上,则返回true。 -
pwd:确认当前目录,pwd与Linux的pwd命令一样,返回当前所在目录。它有一个布尔类型的可选参数tmp,如果参数值为true,则返回与当前工作空间关联的临时目录。 -
writeFile:将内容写入指定文件中,writeFile支持的参数有:file:文件路径,可以是绝对路径,也可以是相对路径。text:要写入的文件内容。encoding(可选):目标文件的编码。如果留空,则使用操作系统默认的编码。如果写的是 Base64 的数据,则可以使用 Base64 编码。
示例如下:
script {
    // amVua2lucyBib29r 是 jenkins book 进行 Base64 编码后的值
    writeFile(file: 'base64File', text: "amVua2lucyBib29r", encoding: 'Base64')
    def content = readFile(file: 'base64File', encoding: 'UTF-8')
    echo content // jenkins book
}
-
stash:保存临时文件,stash步骤可以将一些文件保存起来,以便被同一次构建的其他步骤或阶段使用。如果整个 pipeline 的所有阶段在同一台机器上执行,则stash步骤是多余的。所以,通常需要stash的文件都是要跨 Jenkins node 使用的。stash步骤会将交件存储在tar文件中,对于大文件的stash操作将会消耗 Jenkins master 的计算资源。Jenkins 官方文档推荐,当文件大小为 5~100MB 时,应该考虑使用其他替代方案。
stash步骤的参数列表如下:name:字符串类型,保存文件的集合的唯一标识。allowEmpty:布尔类型,允许stash内容为空。excludes:字符串类型,将哪些文件排除。如果排除多个文件,则使用逗号分隔。留空代表不排除任何文件。includes:字符串类型,stash哪些文件,留空代表当前文件夹下的所有文件。useDefaultExcludes:布尔类型,如果为true,则代表使用 Ant 风格路径默认排除文件列表。
除了
name参数,其他参数都是可选的。excludes和includes使用的是 Ant 风格路径表达式。 -
unstash:取出之前stash的文件,unstash步骤只有一个name参数,即stash时的唯一标识。通常stash与unstash步骤同时使用。以下是完整示例(stash步骤在golang-executor标签标记的节点上执行,而unstash步骤在java-executor标签标记的节点上执行。)。
pipeline {
    agent none
    stages {
        stage('stash') {
            agent {
                label 'golang-executor'
            }

            steps {
                writeFile file: 'a.txt', text: 'hello zze'
                stash(name: 'abc', includes: 'a.txt')
            }
        }

        stage('unstash') {
            agent {
                label 'java-executor'
            }

            steps {
                script {
                    unstash('abc')
                    def content = readFile('a.txt')
                    echo "${content}" // hello zze
                }
            }
        }
    }
}
命令相关步骤
-
sh:执行 shell 命令,sh步骤支持的参数有:script:将要执行的 shell 脚本,通常在类 UNIX 系统上可以是多行脚本。encoding:脚本执行后输出日志的编码,默认值为脚本运行所在系统的编码。returnStatus:布尔类型,默认脚本返回的是状态码,如果是一个非零的状态码,则会引发 pipeline 执行失败。如果returnStatus参数为true。则不论状态码是什么, pipeline 的执行都不会受影响。returnStdout:布尔类型,如果为true。则任务的标准输出将作为步骤的返回值,而不是打印到构建日志中(如果有错误,则依然会打印到日志中),除了script参数,其他参数都是可选的。
returnStatus与returnStdout参数一般不会同时使用,因为返回值只能有一个。如果同时使用,则只有returnStatus参数生效。 -
bat、powershell步骤:bat步骤执行的是 Windows 的批处理命令。powershell步骤执行的是PowerShel脚本,支持 3+ 版本。这两个步骤支持的参数与sh步骤的一样,这里就不重复介绍了。
其它步骤
-
error:主动报错,中止当前 pipeline。error步骤的执行类似于抛出一个异常。它只有一个必需参数:message。通常省略该参数:error("there's an error")。 -
tool:使用预定义的工具,如果在Global Tool Confguration(全局工具配置)中配置了工具,那么可以通过tool步骤得到工具路径。tool步骤支持的参数有:name:工具名称。type(可选):工具类型,指该工具安装类的全路径类名。每个插件的type值都不一样,而且绝大多数插件的文档根本不写type值。除了到该插件的源码中查找,还有一种方法可以让我们快速找到type值,就是前往 Jenkins pipeline 代码片段生成器中生成该tool步骤的代码即可。
-
timeout:代码块超时时间。为timeout步骤闭包内运行的代码设置超时时间限制。如果超时,将抛出一个org.jenkinsci.workflow.steps.FlowInterruptedException异常。timeout步骤支持如下参数: -
time:整型,超时时间。 -
unit(可选):时间单位,支持的值有NANOSECONDS、MICROSECONDS、MILLISECONDS、SECONDS、MINUTES(默认)、HOURS、DAYS。 -
activity(可选):布尔类型,如果值为true,则只有当日志没有活动后,才真正算作超时。 -
waitUntil:等待条件满足。不断重复waitUntil块内的代码,直到条件为true。waitUlntil不负责处理块内代码的异常,遇到异常时直接向外抛出。waitUntil步骤最好与timeout步骤一起使用,避免死循环。示例如下:
steps {
    script {
        def r = sh script: 'curl https://www.zze.xyz', returnStatus: true
        return (r==0)
    }
}
retry:重复执行块。执行 N 次闭包内的脚本。如果其中某次执行抛出异常,则只中止本次执行,并不会中止整个retry的执行。同时,在执行retry的过程中,用户是无法中止 pipeline 的。
steps {
    retry(20){
        script {
            sh script: 'curl https://www.zze.xyz', returnStatus: true
        }
    }
}
-
sleep:让 pipeline 休眠一段时间。sleep步骤可用于简单地暂停 pipeline,其支持的参数有:time:整型,休眠时间。unit(可选),时间单位,支持的值有NANOSECONDS、MICROSECONDS、MILLISECONDS、SECONDS(默认)、MINUTES、HOURS、DAYS。
示例如下:
steps {
    sleep(120) // 休眠 120 秒
    sleep(time: '2', unit: 'MINUTES') // 休眠 2 分钟
}
环境变量
内置变量
在 pipeline 执行时,Jenkins 通过一个名为 env 的全局变量,将 Jenkins 内置环境变量暴露出来。其使用方法有多种,示例如下:
stage('Example') {
    steps {
        echo "Running ${env.BUILD_NUMBER} on ${JENKINS_URL}" // 方法一
        echo "Running $env.BUILD_NUMBER on $env.JENKINS_URL" // 方法二
        echo "Running ${BUILD_NUMBER} on ${JENKINS_URL}" // 方法三
    }
}
默认 env 的属性可以直接在 pipeline 中引用。所以,以上方法都是合法的。但是不推荐方法三,因为出现变量冲突时,非常难查问题。
那么,env 变量都有哪些可用属性呢?通过访问 <Jenkins master 的地址>/pipeline-syntax/globals 来获取完整列表。在列表中,当一个变量被声明为 For a multibranch project 时,代表只有多分支项目才会有此变量。
下面我们简单介绍几个在实际工作中经常用到的变量。
BUILD_NUMBER:构建号,累加的数字。在打包时,它可作为制品名称的一部分,比如server-2.jar。BRANCH_NAME:多分支pipeline项目支持。当需要根据不同的分支做不同的事情时就会用到,比如通过代码将release分支发布到生产环境中、master分支发布到测试环境中。BUILD_URL:当前构建的页面 URL。如果构建失败,则需要将失败的构建链接放在邮件通知中,这个链接就可以是BUILD_URL。GIT_BRANCH:通过 git 拉取的源码构建的项目才会有此变量。
在使用 env 变量时,需要注意不同类型的项目,env 变量所包含的属性及其值是不一样的。比如普通 pipeline 任务中的 GIT_BRANCH 变量的值为 origin/master,而在多分支 pipeline 任务中 GIT_BRANCH 变量的值为 master。
所以,在 pipeline 中根据分支进行不同行为的逻辑处理时,需要留意。
小技巧。在调试 pipeline 时,可以在 pipeline 的开始阶段加一句:
sh printenv,将env变量的属性值打印出来。这样可以帮助我们避免不少问题。
自定义环境变量
当 pipeline 变得复杂时,我们就会有定义自己的环境变量的需求。声明式 pipeline 提供了 environment 指令,方便自定义变量。比如:
pipeline {
    agent any
    environment {
        CC = 'cccc'
    }
    stages {
        stage('Example') {
            environment {
                DD = 'dddd'
            }

            steps {
                sh 'printenv | egrep "CC|DD"'
            }
        }
    }
}
另外,environment 指令可以在 pipeline 中定义,代表变量作用域为整个 pipeline;也可以在 stage 中定义,代表变量只在该阶段有效。怛是这些变量都不是跨 pipeline 的,比如 pipeline a 访问不到 pipeline b 的变量。在 pipeline 之间共享变量可以通过参数化 pipeline 来实现。
在实际工作中,还会遇到一个环境变量引用另一个环境变量的情况。在 environment 中可以这样定义:
environment {
    __server_name = 'mail-server'
    __version = "${BUILD_NUMBER}"
    __artifact_name = "${__server_name}-${__version}.jar"
}
值得注意的是,如果在 environment 中定义的变量与 env 中的变量重名,那么被重名的变量的值会被覆盖掉。
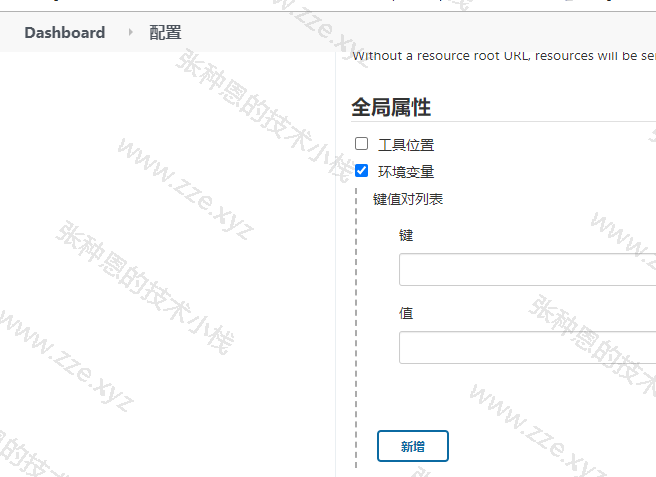
env 中的变量都是 Jenkins 内置的,或者是与具体 pipeline 相关的。有时候,我们需要定义一些全局的跨 pipeline 的自定义变量。进入 系统管理 -> 系统配置 -> 全局属性 页,勾选 环境变量 复选框,单击 新增 按钮,在输入框中输入变量名和变量值即可,如下图所示:
自定义全局环境变量会被加入 env 属性列表中,所以,使用自定义全局环境变量与使用 Jenkins 内置变量的方法无异:${env.name}。
when 指令的用法
when 指令允许 pipeline 根据给定的条件,决定是否执行阶段内的步骤。when 指令必须至少包含一个条件。
常用条件
branch:判断当前阶段的构建是否属于指定的分支,一般仅在多分支任务中使用。
stage('deploy to test') {
    when {
        branch 'master'
    }

    steps {
        echo 'deploy to test'
    }
}

stage('deploy to prod') {
    when {
        branch 'prod'
    }

    steps {
        echo 'deploy to prod'
    }
}
changelog:如果版本控制库的changelog符合正则表达式,则执行。
when {
    changelog '.*\\[DEPENDENCY] .+$'
}
changeset:如果版本控制库的变更集合中包含一个或多个文件符合给定的 Ant 风格路径表达式,则执行。
when {
    changeset '**/*.js'
}
environment:如果环境变量的值与给定的值相同,则执行。
when {
    environment name: 'DEPLOY_TO', value: 'prod'
}
equals:如果期望值与给定的值相同,则执行。
when {
    equals expected: 2, actual: currentBuild.Number
}
expression:如果 Groovy 表达式返回的是true,则执行(当表达式返回的是字符串时,它必须转换成布尔类型或null,否则,所有的字符串都被当作true处理)。
when {
    expression {
        // 支持与、或操作
        // return A && B
        // return A || B
        // 支持函数结果返回值
        // return readFile('pom.xml').contains('component')
        // 支持正则表达式
        // return token ==~ /(?i)(Y|YES|T|TRUE|ON|RUN)/
        return env.BRANCH_NAME != 'master'
    }
}
buildingTag:如果此次 pipeline 所执行的代码被打了 tag,则执行。
when {
    buildingTag()
}
tag:如果 pipeline 所执行的代码被打了 tag,且 tag 名称符合规则,则执行。tag支持pattern和comparator参数,pattern用于指定标签名的匹配规则,``comparator用于指定匹配的模式,comparator` 支持的值如下:EQUALS:简单的文本比较。GLOB(默认值):Ant 风格路径表达式。由于是默认值,所以使用时一般省略。REGEXP:正则表达式。
when {
    tag 'release-*'
}
// 完整写法
when {
    tag pattern: 'release-*', comparator: 'GLOB'
}
如果 tag 的参数为空,即 tag(),则表示不论 tag 名称是什么都执行,与 buildingTag() 的效果相同。
beforeAgent:布尔值,在默认情况下,阶段内所有的代码都将在指定的 Jenkins agent 上执行。when指令提供了一个beforeAgent选项,当它的值为true时,只有符合when条件时才会进入该 Jenkins agent。这样就可以避免没有必要的工作空间的分配,也就不需要等待可用的 Jenkins agent 了。
多条件组合判断
以上介绍的都是单条件判断,when 指令还可以进行多条件组合判断。
allOf:所有条件都必须符合。下例表示当分支为master且环境变量DEPLOY_TO的值为production时,才符合条件。
when {
    allOf {
        branch 'master';
        environment name: 'DEPLOY_TO', value: 'production'
    }
}
注意,多条件之间使用分号分隔。
anyOf:其中一个条件为true,就符合。下例表示master分支或staging分支都符合条件。
when {
    anyOf {
        branch 'master';
        branch 'staging'
    }
}
参数化
参数化 pipeline 是指可以通过传参来决定 pipeline 的行为。参数化让写 pipeline 就像写函数,而函数意味着可重用、更抽象。所以,通常使用参数化 pipeline 来实现一些通用的 pipeline。
在 Jenkins pipeline 中定义参数使用的是 parameters 指令,其只允许被放在 pipeline 块下。看如下示例:
pipeline {
    agent any

    parameters {
        booleanParam(defaultValue: true, description: '', name: 'userFlag')
    }
    stages {
        stage('test') {
            steps {
                echo "flag: ${userFlag}"
            }
        }
    }
}
booleanParam 方法用于定义一个布尔类型的参数。booleanParam 方法接收三个参数。
defaultValue:默认值。description:参数的描述信息。name:参数名。
在定义了 pipeline 的参数后,如何使用呢?
被传入的参数会放到一个名为 params 的对象中,在 pipeline 中可直接使用。params.userFlag 就是引用 parameters 指令中定义的 userFlag 参数。值得注意的是,在 Jenkins 新增此 pipeline 后,至少要手动执行一次,它才会被 Jenkins 加载生效。生效后,在执行项目时,就可以设置参数值了,
为了满足不同的应用场景,参数化 pipeline 支持多种参数类型,包括:
string:字符串类型。
parameters {
    string(name: 'DEPLOY_ENV', defaultValue: 'staging', description: '')
}
text:多行文本类型,换行使用\n。
parameters {
    text(name: 'DEPLOY_TEXT', defaultValue: 'one\ntwo\three\n', description: '')
}
booleanParam:布尔类型。
parameters {
    booleanParam(name: 'DEBUG_BUILD', defaultValue: false, description: '')
}
choice:选择参数类型,使用\n来分隔多个选项。
parameters {
    choice(name: 'CHOICES', choices: 'dev\ntest\nprod', description: '请选择部署的环境')
}
password:密码类型。
parameters {
    password(name: 'PASSWORD', defaultValue: 'SECRET', description: '请输入密码')
}
使用凭证
Jeakin 默认支持以下凭证类型:Secret text、Username with password、Secret file、SSH Username with private key、Certificate。
添加凭证后,安装 Credentials Binding Plugin插件,通过其提供的 withCredentias 步骤就可以在 pipeline 中使用凭证了。
withCredentials
Secret text:是一串需要保密的文本,比如 GitLab 的 API token。
withCredentials([string(credentialsId: 'test-secret-text', variable: 'secret_text')]) {
    echo "${secret_text}"
}
Username with password:用户名和密码凭证。
withCredentials([usernamePassword(credentialsId: "harbor-auth", passwordVariable: 'password', usernameVariable: 'username')]) {
    echo "${password}"
    echo "${username}"
}
Secret file:需要保密的文本文件。使用Secret file时,Jenkins 会将文件复制到一个临时目录中,再将文件路径设置到一个变量中。构建结束后,所复制的Secret file会被删除。
withCredentials([file(credentialsId: "k8s-token", variable: 'k8s_token_path')]) {
    script {
        sh("cp ${k8s_token_path} .")
    }
}
SSH Username with private key:一对 SSH 用户名和密钥。
withCredentials([sshUserPrivateKey(credentialsId: "admin-private-key", keyFileVariable: 'key_path', usernameVariable: 'admin_username', passphraseVariable: 'key_text')]) {
    echo "${key_path}"
    echo "${admin_username}"
    echo "${key_text}"
}
withDockerRegistry
withDockerRegistry 可自动获取 credentialsId 对应的凭证完成 Docker login 操作,在其闭包内的语句都会在认证后的上下文执行。
withDockerRegistry(credentialsId: "${harborCredentialsId}", url: "http://${registryAddr}") {
    sh """
    docker build -t ${imageName} .
    docker push ${imageName}
    """
}
使用该步骤需要额外安装
Docker pipeline插件。
明文打印凭证
默认情况下在 withCredentials 内部输出凭证信息是加密后的 ***,如果想要明文输出凭证信息,则需要在 withCredentials 外部定义一个变量接收凭证变量,然后在外部即可明文输出凭证内容:
script {
    def hack = ''
    withCredentials([usernamePassword(credentialsId: "harbor", passwordVariable: 'password', usernameVariable: 'username')]) {
        echo "${password}"
        echo "${username}"
        hack = "${password}"
    }
    echo "${hack}"
}
并行构建
并行阶段
pipeline {
    agent none
    stages {
        stage('Run Tests') {
            failFast true
            parallel {
                stage('Test on Chrome') {
                    agent { label 'chrome' }
                    steps {
                        echo 'Chrome UI 测试'
                    }
                }

                stage('Test on Filefox') {
                    agent { label 'firefox' }
                    steps {
                        echo 'Firefox UI 测试'
                    }
                }

                stage('Test on IE') {
                    agent { label 'ie' }
                    steps {
                        echo 'IE UI 测试'
                    }
                }
            }
        }
    }
}
位于 parallel 块下的阶段都将并行执行,而且并行阶段还可以被分到不同的 Jenkins agent 上执行,在默认情况下,Jenkins pipeline 要等待 parallel 块下所有的阶段都执行完成,才能确定结果。如果希望所有并行阶段中的某个阶段失败后,就让其他正在执行的阶段都中止,那么只需要在与 parallel 块同级的位置加人 failFast: true 就可以了。
并行步骤
stage('并行构建') {
    steps {
        parallel {
                jdk8: {
                    echo "jdk8 build"
                },
                jdk9: {
                    echo "jdk9 build"
                }
        }
    }
}
除了写法的不同,表面上看并行阶段与并行步骤并没有太大的区别。但是它们有一个关键的区别。并行阶段运行在不同的 executor 上,而并行步骤运行在同一个 executor 上,这样看来其实就是并行与并发的区别。并行步骤本质上是并发步骤。
在不同分支上并行
pipeline {
    agent any
    stages {
        stage('Parallel Stage') {
            failFast true
            parallel {
                stage('Branch master') {
                    when { branch 'master' }
                    agent any
                    steps {
                        echo 'On Branch master'
                    }
                }

                stage('Branch dev') {
                    when { branch 'dev' }
                    agent any
                    steps {
                        echo 'On Branch dev'
                    }
                }

                stage('Branch staging') {
                    when { branch 'staging' }
                    agent any
                    stages {
                        stage('嵌套 staging 1') {
                            steps {
                                echo 'staging 1'
                            }
                        }

                        stage('嵌套 staging 2') {
                            steps {
                                echo 'staging 2'
                            }
                        }
                    }
                }
            }
        }
    }
}
我们注意到在并行阶段 Branch staging 下又出现一个 stages 部分。是的,阶段是可以嵌套的。但是可以嵌套多少层呢?Jenkins 的文档并没有明确说明。建议不要超过三层,因为在同一个 Jenkins pipeline中实现过于复杂的逻辑,说明 Jenkins pipeline 的职责不够单一,需要进行拆分。
综合示例
def registryAddr = params.isRelease?"registry.cn-shenzhen.aliyuncs.com":"10.41.1.12:8081"
def gitCredentialsId='jenkins'
def harborCredentialsId=params.isRelease?'aliyun-docker-registry':'harbor'
def gitUrl='http://git.zze.com/git/zze-monitor.git'
def gitConfigBranch=params.isRelease?'production':'master'
// 镜像标签
def imageTag = "${createTag()}"
def prj = params.isRelease?"zze-monitor":"${JOB_NAME}"
// 离线镜像地址
def imgsDir = "/root/images/${prj}/${imageTag}/imgs"
// 离线 chart 地址
def chartsDir = "/root/images/${prj}/${imageTag}/charts"

def createTag() {
    def image_tag = "${params.branchTag}_${new Date().format('yyyyMMddHHmmss')}_${BUILD_NUMBER}"
    if(params.isRelease){
        image_tag = image_tag + "_release"
    }
    return image_tag
}

pipeline {
    agent {
        label 'golang-executor'
    }

    options {
        buildDiscarder(logRotator(numToKeepStr: '10', daysToKeepStr: '3'))
        // disableConcurrentBuilds()
        retry(1)
        timeout(time: 60, unit: 'MINUTES')
    }

    parameters {
        booleanParam(name: 'isDeploy', defaultValue: true, description: '立即部署')
        booleanParam(name: 'isRelease', defaultValue: false, description: '打离线包')
        gitParameter(name: 'branchTag',
                     type: 'PT_BRANCH_TAG',
                     branchFilter: 'origin/(.*)',
                     defaultValue: 'func_saas_202101_dev',
                     selectedValue: 'DEFAULT',
                     sortMode: 'DESCENDING_SMART',
					 description: '选择要构建的分支或标签')
        extendedChoice(
            name: 'serviceSelectStr',
            defaultValue: '',
            description: '选择要构建的服务',
            type: 'PT_CHECKBOX',
            value: 'zze-cron-job,zze-monitor-admin,zze-monitor-agent,zze-monitor-alarm,zze-monitor-core,zze-monitor-login,zze-monitor-platform,zze-monitor-transfer,zze-monitor-websocket,zze-monitor-judge'
        )
    }

    environment {
        GOPATH = "${env.WORKSPACE}/"
    }

    stages {
        stage('拉取代码') {
            options { retry(5) }
            steps {
                checkout([$class: 'GitSCM', branches: [[name: "${params.branchTag}"]], doGenerateSubmoduleConfigurations: false, userRemoteConfigs: [[credentialsId: "${gitCredentialsId}", url: "${gitUrl}"]]])
                sh 'mkdir -p configs'
                dir('configs') {
                    git branch: "${gitConfigBranch}", credentialsId: 'jenkins', url: 'https://git.zze.com/zhangxin/config-server.git'
                }
            }
        }

        stage('并行构建') {
            steps {
                script{
                    if(params.isRelease) {
                        sh("mkdir -p ${imgsDir} ${chartsDir} && cp ${env.WORKSPACE}/configs/global.json ${chartsDir}/global.json")
                    }

                    def jobMap = [: ]
                    def serviceSelectLst = params.serviceSelectStr.split(',')
                    for (service in serviceSelectLst){
                        def currentService = service
                        jobMap.put(currentService, {
                            def imageName = "${registryAddr}/${prj}/${currentService}:${imageTag}"
                            def helmInstallOpts = "-f ${env.WORKSPACE}/configs/global.json --set image.domain=${registryAddr}/${prj} --set image.repository=${currentService} --set image.tag=${imageTag}"
                            // def helmInstallOpts="--set image.domain=${registryAddr}/${prj} --set image.repository=${currentService} --set image.tag=${imageTag}"

                            stage("${currentService} 编译") {
                                dir("server/${currentService}") {
                                    sh "go build -o build/docker/${currentService}"
                                }
                            }

                            stage("${currentService} 构建镜像") {
                                dir("server/${currentService}") {
                                    withDockerRegistry(credentialsId: "${harborCredentialsId}", url: "http://${registryAddr}") {
                                        sh """
                                        cd build
                                        docker build -f dockerfile -t "${imageName}" .
                                        docker push ${imageName}
                                        """
                                    }
                                }
                                echo "构建完成的镜像地址:${imageName}"
                            }

                            if(params.isRelease) {
                                stage("${currentService} 打离线包") {
                                    sh """
                                    # docker save -o ${imgsDir}/${currentService}.dockerimg ${imageName}
                                    cp -r server/${currentService}/build/helmchart ${chartsDir}/${currentService}
                                    echo 'helm install -f global.json --set imagePullSecrets=zze-aliyun-repo --set image.domain=${registryAddr}/${prj} --set image.repository=${currentService} --set image.tag=${imageTag} ${currentService} ./${currentService}' >> ${chartsDir}/install.sh
                                    """
                                }
                            }

                            if(params.isDeploy) {
                                stage("${currentService} 部署到 Kubernetes") {
                                    sleep 3
                                    dir("server/${currentService}/build") {
                                        sh """
                                        helm list -q | grep '${currentService}' && helm upgrade ${helmInstallOpts} ${currentService} ./helmchart/ || helm install ${helmInstallOpts} ${currentService} ./helmchart/
                                        """
                                    }
                                }
                            }
                        })
                    }
                    parallel(jobMap)
                }
            }
        }
    }

    post {
        always {
            sh '''
            helm list && sleep 10
            until [ $(kubectl get pod -n zze | grep -i 'imagepull' | wc -l) -eq 0 ];do
                kubectl get pod -n zze
                kubectl get pod -n zze | grep -i 'imagepull' | awk '{print $1}' | xargs -i kubectl delete pod {} -n zze
                sleep 5
            done
            '''
        }
    }
}
评论区