开始之前我们需要约定环境如下:
- 为避免默认配置对我们测试造成影响,我们先将默认的配置文件
/etc/nginx/nginx.conf中的server段删除或注释。 - 接下来所有测试的配置文件都是在
/etc/nginx/conf.d/下创建的。 - 创建一个
/www目录作为 nginx 测试页面存放位置。
默认首页的功能由 ngx_http_index_module 模块支持,当 ngx_http_index_module 模块找不到索引文件时,通常会将请求传递给 ngx_http_autoindex_module 模块。
而 ngx_http_autoindex_module 模块就提供了目录索引的支持,该模块处理以斜杠字符(/)结尾的请求,并生成目录列表返回。
那我们就先看一下 ngx_http_index_module 模块,该模块的作用是当我们访问一个域名或 IP 不带具体路径的地址时自动转发给我们一个指定的首页。
1、先创建一个 /www/test1/index.html 作为测试首页:
$ mkdir /www/test1 -p && echo test1 Index > /www/test1/index.html
2、新建 test1.conf 配置文件,内容如下:
$ cat test1.conf
server {
        listen 80;

        location / {
                root /www/test1;
        }
}
3、重启 nginx,访问:
$ curl 10.0.1.202
test1 Index
在上面配置中我们并没有指定访问 / 显示的具体页面,但是默认还是给我们展示了 /www/test1/index.html 的内容,这是因为 ngx_http_index_module 模块默认配置如下:
index index.html;
即默认就指定了当我们没有具体指定访问哪个页面时就默认显示访问目录下的名为 index.html 的文件。
index 指令后可以跟多个文件名称,文件名可以包含变量。文件按指定的顺序检查。列表的最后一个元素可以是一个具有绝对路径的文件。如下:
index index.$geo.html index.0.html /index.html;
4、修改 test1.conf 如下:
$ cat test1.conf
server {
        listen 80;

        location / {
                root /www/test1;
                index home.html;
        }
}
5、重启 nginx,再次访问:
$ curl 10.0.1.202
<html>
<head><title>403 Forbidden</title></head>
<body>
<center><h1>403 Forbidden</h1></center>
<hr><center>nginx/1.16.1</center>
</body>
</html>
可以发现最后给我们返回了 403 拒绝,可是按我们的想法这种情况不是应该返回 404 表示找不到首页 home.html 吗?
我们先查看一下报错信息:
$ tailf /var/log/nginx/error.log
2020/03/04 16:41:45 [error] 17602#0: *5 directory index of "/www/test1/" is forbidden, client: 10.0.1.1, server: , request: "GET / HTTP/1.1", host: "10.0.1.202"
我们可以看到实际的报错信息是 directory index of "/www/test1/" is forbidden,即对 /www/test1 的目录索引被拒绝。
哦豁~~~我们在开头也说过“当 ngx_http_index_module 模块找不到索引文件时,通常会将请求传递给 ngx_http_autoindex_module 模块”,就是这样啦,因为在 /www/test1 下找不到 home.html 作为首页显示,所以就将该次请求交给 ngx_http_autoindex_module 模块处理,但由于我们并没有明确指定开启 ngx_http_autoindex_module 模块的目录索引功能,所以就出现了 Forbidden 访问拒绝。
6、那下面我们就来开启一下目录索引功能,修改 test1.conf 内容如下:
$ cat test1.conf
server {
        listen 80;

        location / {
                root /www/test1;
                index home.html;
                # 开启目录索引
                autoindex on;
        }
}
7、重启 nginx,这次使用浏览器访问:

可以看到,/www/test1 下的文件已经被索引后以 HTML 格式展示给我们了。
ngx_http_autoindex_module 模块中除了 autoindex 外还有如下几个指令:
autoindex_exact_size: 以 bytes 为单位显示文件确切大小,修改为 off 则会以人类可读的形式进行单位转换,单位是 kB、MB 或者 GB。
	语法: autoindex_exact_size on | off;
	默认: autoindex_exact_size on;
	可使用的上下文: http, server, location;

autoindex_format: 指定索引格式。
	语法: autoindex_format html | xml | json | jsonp;
	默认: autoindex_format html;
	可使用的上下文: http, server, location;
	该指令出现在 1.7.9 版本。

autoindex_localtime: 显示的文件时间为实际的服务器时间。
	语法: autoindex_localtime on | off;
	默认: autoindex_localtime off;
	可使用的上下文: http, server, location;
8、测试一下单位转换和本地时间功能,修改 test1.conf 内容如下:
$ cat test1.conf
server {
        listen 80;

        location / {
                root /www/test1;
                index home.html;
                autoindex on;
                autoindex_exact_size off;
                autoindex_localtime on;
        }
}
9、移动一个大文件到 /www/test1 目录下,使用浏览器访问:

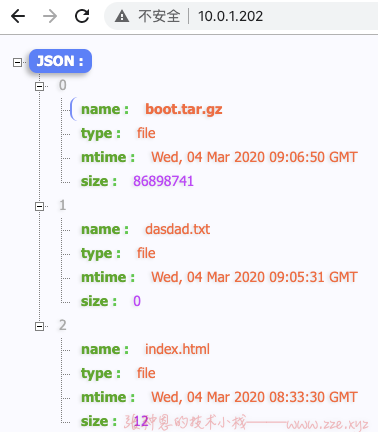
10、测试一下列表格式功能,再次修改 test1.conf:
$ cat test1.conf
server {
        listen 80;

        location / {
                root /www/test1;
                index home.html;
                autoindex on;
                autoindex_exact_size off;
                autoindex_localtime on;
                autoindex_format json;
        }
}
11、使用浏览器访问:

-de8bd8f33c3e44a59907dafe1884f228.png)


评论区