-de8bd8f33c3e44a59907dafe1884f228.png)


背景
随着互联网技术的发展,现在的网站架构基本都由原来的后端渲染,变成了前端渲染、前后端分离的形态,而且前端技术和后端技术在各自的道路上越走越远。
前端和后端的唯一联系,变成了API接口。 API文档变成了前后端开发人员联系的纽带,变得越来越重要,swagger 就是一款能够帮助我们自动生成 API 文档的框架。
认识Swagger
Swagger 是一个规范和完整的框架,用于生成、描述、调用和可视化 RESTful 风格的 Web 服务。总体目标是使客户端和文件系统作为服务器以同样的速度来更新。文件的方法,参数和模型紧密集成到服务器端的代码,允许 API 来始终保持同步。
Swagger 官网:https://swagger.io。
作用
- 接口的文档在线自动生成。
- 功能测试。
目标
Swagger 的目标是为 REST APIs 定义一个标准的与语言无关的接口,使人和计算机在看不到源码或者看不到文档或者不能通过网络流量检测的情况下能发现和理解各种服务的功能。
Swagger 是一组开源项目,其中主要要项目如下:
- Swagger-tools:提供各种与 Swagger 进行集成和交互的工具。例如模式检验、Swagger 1.2 文档转换成 Swagger 2.0 文档等功能。
- Swagger-core:用于 Java/Scala 的 Swagger 实现。与 JAX-RS(Jersey、Resteasy、CXF...)、Servlet 和 Play 框架进行集成。
- Swagger-js:用于 JavaScript 的 Swagger 实现。
- Swagger-node-express:Swagger 模块,用于 node.js 的 Express web 应用框架。
- Swagger-ui:一个无依赖的 HTML、JS 和 CSS 集合,可以为 Swagger 兼容 API 动态生成优雅文档。
- Swagger-codegen:-个模板驱动引擎,通过分析用户 Swagger 资源声明以各种语言生成客户端代码。
使用
1、使用 Maven 创建 SpringBoot 工程,引入 Swagger 相关依赖:
<dependency>
    <groupId>io.springfox</groupId>
    <artifactId>springfox-swagger2</artifactId>
    <version>2.7.0</version>
</dependency>

<dependency>
    <groupId>io.springfox</groupId>
    <artifactId>springfox-swagger-ui</artifactId>
    <version>2.7.0</version>
</dependency>

<dependency>
    <groupId>com.fasterxml.jackson.core</groupId>
    <artifactId>jackson-databind</artifactId>
    <version>2.6.7</version>
</dependency>

<dependency>
    <groupId>org.projectlombok</groupId>
    <artifactId>lombok</artifactId>
    <version>1.16.22</version>
</dependency>
2、创建 Swagger 配置类:
package xyz.zze.study.swagger.config;

import org.springframework.context.annotation.Bean;
import org.springframework.context.annotation.ComponentScan;
import org.springframework.context.annotation.Configuration;
import org.springframework.web.servlet.config.annotation.EnableWebMvc;
import springfox.documentation.builders.ApiInfoBuilder;
import springfox.documentation.service.ApiInfo;
import springfox.documentation.service.Contact;
import springfox.documentation.spi.DocumentationType;
import springfox.documentation.spring.web.plugins.Docket;
import springfox.documentation.swagger2.annotations.EnableSwagger2;

@Configuration // 必须存在
@EnableSwagger2 // 必须存在
@EnableWebMvc // 必须存在
// 扫描 Controller
@ComponentScan(basePackages = {"xyz.zze.study.swagger.demo.controller"})
public class SwaggerConfig {
    @Bean
    public Docket customDocket() {
        return new Docket(DocumentationType.SWAGGER_2).apiInfo(apiInfo());
    }

    private ApiInfo apiInfo() {
        // 配置 API 信息
        Contact contact = new Contact("ZZE", "http://www.zze.xyz", "632404164@qq.com");
        return new ApiInfoBuilder().
                title("测试项目 API 接口").
                description("测试 API 接口描述").
                contact(contact).
                version("1.0").
                build();
    }
}
3、配置 Swagger 资源映射:
package xyz.zze.study.swagger.config;

import org.springframework.context.annotation.Configuration;
import org.springframework.web.servlet.config.annotation.ResourceHandlerRegistry;
import org.springframework.web.servlet.config.annotation.WebMvcConfigurer;

@Configuration
public class WebMvcConfig implements WebMvcConfigurer {

    @Override
    public void addResourceHandlers(ResourceHandlerRegistry registry) {
        registry.addResourceHandler("swagger-ui.html")
                .addResourceLocations("classpath:/META-INF/resources/");
        registry.addResourceHandler("/webjars/**")
                .addResourceLocations("classpath:/META-INF/resources/webjars/");
    }
}
4、编写 Java Bean,并使用 Swagger 注解描述实体和字段:
package xyz.zze.study.swagger.bean;

import io.swagger.annotations.ApiModel;
import io.swagger.annotations.ApiModelProperty;
import lombok.AllArgsConstructor;
import lombok.Data;

@Data
@AllArgsConstructor
@ApiModel("用户实体")
public class User {
    @ApiModelProperty("用户 id")
    private String name;
    @ApiModelProperty("用户年龄")
    private Integer age;
}
5、测试控制器类的编写:
package xyz.zze.study.swagger.controller;

import io.swagger.annotations.Api;
import io.swagger.annotations.ApiImplicitParam;
import io.swagger.annotations.ApiOperation;
import org.springframework.web.bind.annotation.*;
import xyz.zze.study.swagger.bean.User;

import java.util.ArrayList;
import java.util.List;

@Api(tags = "用户相关接口", description = "提供用户相关的 Rest API")
@RestController
public class UserController {
    // 模拟数据库
    public static List<User> users = new ArrayList<>();

    static {
        users.add(new User("张三", 20));
        users.add(new User("李四", 21));
    }

    @ApiOperation(value = "获取用户列表", notes = "获取所有用户的信息")
    @GetMapping("/users")
    public Object index(){
        return users;
    }

    @ApiOperation(value = "根据 ID 查询用户",notes = "查询单个用户的信息")
    @ApiImplicitParam(name="id",value="用户ID",dataType = "int",paramType = "path")
    @GetMapping("/users/{id}")
    public Object getUserById(@PathVariable Integer id){
        return users.get(id);
    }

    @ApiOperation(value = "添加用户")
    @PostMapping("/user")
    public Object add(User user){
        return users.add(user);
    }

    @ApiOperation(value = "删除用户", notes = "根据 url 中的 id 删除用户")
    @DeleteMapping(value = "/users/id")
    public void delete(@PathVariable int id){
        users.remove(id);
    }
}
6、启动项目,访问 localhost:8080/swagger-ui.html:
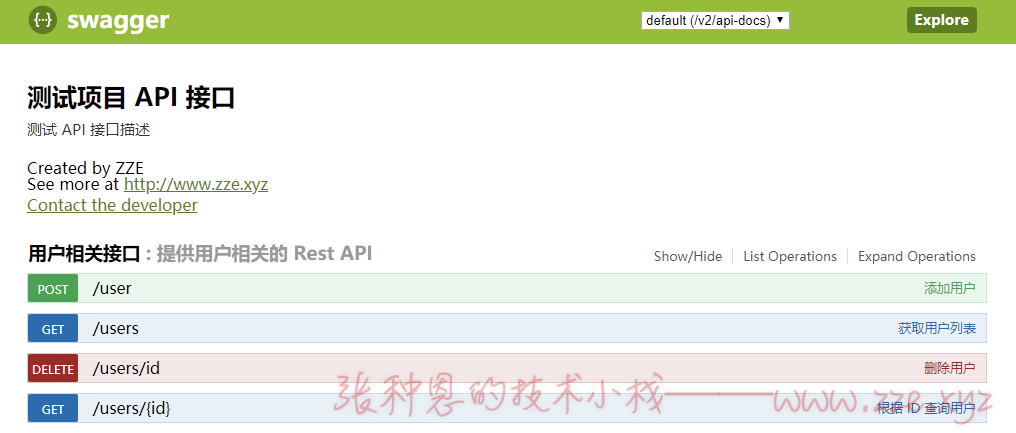
注解所表示的含义其实一目了然,这里仅简单的做入门使用示例,不做详细描述。
评论区