-de8bd8f33c3e44a59907dafe1884f228.png)


介绍
基本架构
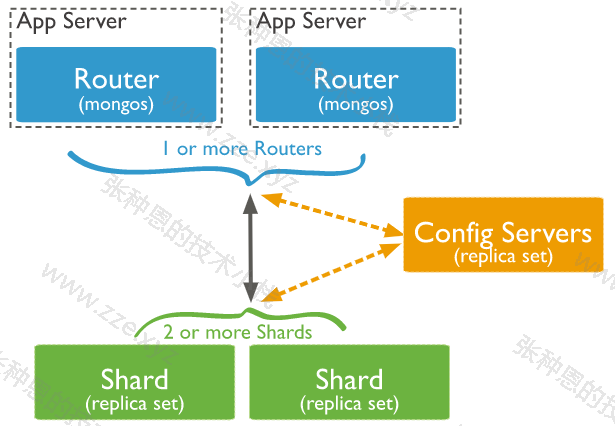
一个基本的 MongoDB 分片集群由如下组件组成:
- shard(分片):每个分片存储一部分数据,且每个分片都可以部署为复制集;
- mongos:mongos 充当一个查询路由器的角色,提供客户端应用程序和分片集群之间交互的接口;
- config servers(配置服务器):配置服务器其实就是一个集中式配置管理中心,用来存储集群的元数据和配置信息,从 MongoDB 3.4 开始,必须将配置服务器部署为复制集;
存储原理
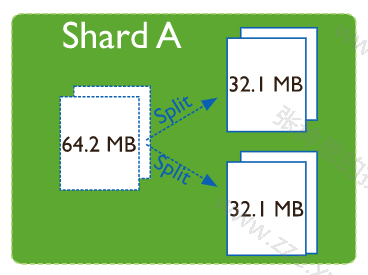
在 MongoDB 中最小的逻辑存储的单位为 chunk(类似 MySQL 中的 page),其默认大小为 64MB(可配置)。
MongoDB 初始时仅有一个 chunk,当该 chunk 存储的数据量超过 64MB 时,就会分裂(chunk splits)成为两个大小为 64MB 的 chunk,然后这两个 chunk 又可继续纳入存储新数据。
在分片集群的架构中,mongos 中会有一个 balancer 组件自动检查各 shard 节点中的 chunk 是否是均匀存储的,如果不是,balancer 组件会触发 chunk 的迁移(chunk migration),以保证数据在各 shard 中均匀存储。

参考:
分片键
分片键是文档的一个属性字段或者一个复合索引字段,一旦建立不能改变,大小限制为 512bytes。
分片键是分片拆分数据的关键,同时还用于路由查询,分片键的选择直接影响集群的性能。
如果一个分片中的 collection 定义了分片键,那么后续针对这个 collection 录入的 document 必须包含该分片键,且不能是空。
注意:分片键也是查询时常用的一个索引。
常用的分片类型有如下两种:
- 范围(range)分片:初始有一个主分片,写入数据时先一股脑在主分片写入,之后由 balancer 调度数据均匀分布到其它分片;
- 哈希(hash)分片:它的优点是可以使数据在各节点分布比较均匀,数据写入可随机分发到每个分片服务器上,把写入的压力分散到了各个服务器上。但是读也是随机的,可能会命中更多的分片;
部署
环境规划
我这里实验环境大致如下:
- 系统:CentOS 7.8;
- 内存大小:2G;
- 主机 IP:10.0.1.51;
准备 10 个实例,占用端口范围为:38017-38026,具体规划如下:
| 角色 | 复制集名称 | 占用端口范围 | 描述 |
|---|---|---|---|
| configserver | configsvr | 38018-38020 | 三个实例构成的复制集(一主两从,不支持 arbiter)。 |
| shard 节点 | sh1 | 38021-38023 | 一主两从,其中一个节点为 arbiter。 |
| shard 节点 | sh2 | 38024-38026 | 一主两从,其中一个节点为 arbiter。 |
| mongos | - | 38017 | - |
注意:
- 做如下操作之前请按第一篇文章将 MongoDB 二进制包解压到指定路径并配置好环境变量。
- 下面的操作中除了 systemd 配置外都需要在
mongod用户下进行。
shard
1、创建 6 个新节点对应的 6 套目录:
$ mkdir -pv /mongodb/{38021,38022,38023,38024,38025,38026}/{conf,log,data}
2、配置第一组复制集 sh1(38021-38023):
$ cat > /mongodb/38021/conf/mongod.conf  <<EOF
systemLog:
  destination: file
  path: /mongodb/38021/log/mongodb.log
  logAppend: true
storage:
  journal:
    enabled: true
  dbPath: /mongodb/38021/data
  directoryPerDB: true
  #engine: wiredTiger
  wiredTiger:
    engineConfig:
      cacheSizeGB: 1
      directoryForIndexes: true
    collectionConfig:
      blockCompressor: zlib
    indexConfig:
      prefixCompression: true
net:
  bindIp: 10.0.1.51,127.0.0.1
  port: 38021
replication:
  oplogSizeMB: 2048
  replSetName: sh1
# 配置当前节点在分片集群中的角色为 shardsvr(shard 服务)
sharding:
  clusterRole: shardsvr
processManagement:
  fork: true
EOF

# 拷贝
$ \cp  /mongodb/38021/conf/mongod.conf  /mongodb/38022/conf/
$ \cp  /mongodb/38021/conf/mongod.conf  /mongodb/38023/conf/

# 替换端口
$ sed 's#38021#38022#g' /mongodb/38022/conf/mongod.conf -i
$ sed 's#38021#38023#g' /mongodb/38023/conf/mongod.conf -i
3、配置第二组复制集 sh2(38024-38026):
$ cat > /mongodb/38024/conf/mongod.conf <<EOF
systemLog:
  destination: file
  path: /mongodb/38024/log/mongodb.log
  logAppend: true
storage:
  journal:
    enabled: true
  dbPath: /mongodb/38024/data
  directoryPerDB: true
  wiredTiger:
    engineConfig:
      cacheSizeGB: 1
      directoryForIndexes: true
    collectionConfig:
      blockCompressor: zlib
    indexConfig:
      prefixCompression: true
net:
  bindIp: 10.0.1.51,127.0.0.1
  port: 38024
replication:
  oplogSizeMB: 2048
  replSetName: sh2
# 配置当前节点在分片集群中的角色为 shardsvr(shard 服务)
sharding:
  clusterRole: shardsvr
processManagement:
  fork: true
EOF

# 拷贝
$ \cp  /mongodb/38024/conf/mongod.conf  /mongodb/38025/conf/
$ \cp  /mongodb/38024/conf/mongod.conf  /mongodb/38026/conf/

# 替换端口
$ sed 's#38024#38025#g' /mongodb/38025/conf/mongod.conf -i
$ sed 's#38024#38026#g' /mongodb/38026/conf/mongod.conf -i
4、配置新添加的 6 个实例被 systemd 管理:
$ cat << EOF > /etc/systemd/system/mongod38021.service
[Unit]
Description=mongodb
After=network.target remote-fs.target nss-lookup.target
[Service]
User=mongod
Type=forking
ExecStart=/mongodb/bin/mongod --config /mongodb/38021/conf/mongod.conf
ExecReload=/bin/kill -s HUP
ExecStop=/mongodb/bin/mongod --config /mongodb/38021/conf/mongod.conf --shutdown
PrivateTmp=true
[Install]
WantedBy=multi-user.target
EOF

# 复制
$ \cp /etc/systemd/system/mongod38021.service /etc/systemd/system/mongod38022.service
$ \cp /etc/systemd/system/mongod38021.service /etc/systemd/system/mongod38023.service
$ \cp /etc/systemd/system/mongod38021.service /etc/systemd/system/mongod38024.service
$ \cp /etc/systemd/system/mongod38021.service /etc/systemd/system/mongod38025.service
$ \cp /etc/systemd/system/mongod38021.service /etc/systemd/system/mongod38026.service

# 替换使用的配置文件
$ sed 's#38021#38022#g' /etc/systemd/system/mongod38022.service -i
$ sed 's#38021#38023#g' /etc/systemd/system/mongod38023.service -i
$ sed 's#38021#38024#g' /etc/systemd/system/mongod38024.service -i
$ sed 's#38021#38025#g' /etc/systemd/system/mongod38025.service -i
$ sed 's#38021#38026#g' /etc/systemd/system/mongod38026.service -i
5、启动新创建的 6 个节点并检查监听端口:
$ systemctl start mongod3802{1..6}.service

$ ss -tanl | grep 380
LISTEN     0      128    127.0.0.1:38021                    *:*
LISTEN     0      128    10.0.1.51:38021                    *:*
LISTEN     0      128    127.0.0.1:38022                    *:*
LISTEN     0      128    10.0.1.51:38022                    *:*
LISTEN     0      128    127.0.0.1:38023                    *:*
LISTEN     0      128    10.0.1.51:38023                    *:*
LISTEN     0      128    127.0.0.1:38024                    *:*
LISTEN     0      128    10.0.1.51:38024                    *:*
LISTEN     0      128    127.0.0.1:38025                    *:*
LISTEN     0      128    10.0.1.51:38025                    *:*
LISTEN     0      128    127.0.0.1:38026                    *:*
LISTEN     0      128    10.0.1.51:38026                    *:*
6、初始化第一组复制集 sh1(38021-38023):
$ mongo --port 38021
MongoDB shell version v3.6.12
connecting to: mongodb://127.0.0.1:38021/?gssapiServiceName=mongodb
...
> use admin
> config = {_id: 'sh1', members: [
                          {_id: 0, host: '10.0.1.51:38021'},
                          {_id: 1, host: '10.0.1.51:38022'},
                          {_id: 2, host: '10.0.1.51:38023',"arbiterOnly":true}]
           }
> rs.initiate(config)
{ "ok" : 1 }
sh1:SECONDARY>
sh1:PRIMARY>
7、初始化第二组复制集 sh2(38024-38026):
$ mongo --port 38024
MongoDB shell version v3.6.12
connecting to: mongodb://127.0.0.1:38024/?gssapiServiceName=mongodb
...
> use admin
> config = {_id: 'sh2', members: [
                          {_id: 0, host: '10.0.1.51:38024'},
                          {_id: 1, host: '10.0.1.51:38025'},
                          {_id: 2, host: '10.0.1.51:38026',"arbiterOnly":true}]
           }
> rs.initiate(config)
{ "ok" : 1 }
sh2:SECONDARY>
sh2:PRIMARY>
config servers
1、创建 3 个新节点对应的 3 套目录:
$ mkdir -pv /mongodb/{38018,38019,38020}/{conf,log,data}
2、修改配置文件:
$ cat > /mongodb/38018/conf/mongod.conf <<EOF
systemLog:
  destination: file
  path: /mongodb/38018/log/mongod.log
  logAppend: true
storage:
  journal:
    enabled: true
  dbPath: /mongodb/38018/data
  directoryPerDB: true
  #engine: wiredTiger
  wiredTiger:
    engineConfig:
      cacheSizeGB: 1
      directoryForIndexes: true
    collectionConfig:
      blockCompressor: zlib
    indexConfig:
      prefixCompression: true
net:
  bindIp: 10.0.1.51,127.0.0.1
  port: 38018
replication:
  oplogSizeMB: 2048
  replSetName: configReplSet
# 配置当前节点在分片集群中的角色为 configsvr(配置服务)
sharding:
  clusterRole: configsvr
processManagement:
  fork: true
EOF

# 复制
$ \cp /mongodb/38018/conf/mongod.conf /mongodb/38019/conf/
$ \cp /mongodb/38018/conf/mongod.conf /mongodb/38020/conf/

# 替换
$ sed 's#38018#38019#g' /mongodb/38019/conf/mongod.conf -i
$ sed 's#38018#38020#g' /mongodb/38020/conf/mongod.conf -i
3、配置新添加的 3 个实例被 systemd 管理:
$ cat << EOF > /etc/systemd/system/mongod38018.service
[Unit]
Description=mongodb
After=network.target remote-fs.target nss-lookup.target
[Service]
User=mongod
Type=forking
ExecStart=/mongodb/bin/mongod --config /mongodb/38018/conf/mongod.conf
ExecReload=/bin/kill -s HUP
ExecStop=/mongodb/bin/mongod --config /mongodb/38018/conf/mongod.conf --shutdown
PrivateTmp=true
[Install]
WantedBy=multi-user.target
EOF

# 复制
$ \cp /etc/systemd/system/mongod38018.service /etc/systemd/system/mongod38019.service
$ \cp /etc/systemd/system/mongod38018.service /etc/systemd/system/mongod38020.service

# 替换
$ sed 's#38018#38019#g' /etc/systemd/system/mongod38019.service -i
$ sed 's#38018#38020#g' /etc/systemd/system/mongod38020.service -i
4、启动新创建的 3 个节点并检查监听端口:
# 启动
$ systemctl start mongod380{18..20}.service
# 检查
$ ss -tanl | grep 380
# 省略前面 6 个节点的端口
...
LISTEN     0      128    127.0.0.1:38018                    *:*
LISTEN     0      128    10.0.1.51:38018                    *:*
LISTEN     0      128    127.0.0.1:38019                    *:*
LISTEN     0      128    10.0.1.51:38019                    *:*
LISTEN     0      128    127.0.0.1:38020                    *:*
LISTEN     0      128    10.0.1.51:38020                    *:*
5、配置复制集:
$ mongo --port 38018
MongoDB shell version v3.6.12
connecting to: mongodb://127.0.0.1:38018/?gssapiServiceName=mongodb
...
> use admin
> config = {_id: 'configReplSet', members: [
                          {_id: 0, host: '10.0.1.51:38018'},
                          {_id: 1, host: '10.0.1.51:38019'},
                          {_id: 2, host: '10.0.1.51:38020'}]
           }
> rs.initiate(config)
configReplSet:SECONDARY>
configReplSet:PRIMARY>
注:
- configserver 可以是一个节点,官方建议使用复制集。且 configserver 复制集中不能有 arbiter;
- mongodb 3.4 之后,虽然要求 config server 为 ReplicaSet,但是不支持 arbiter;
mongos
1、创建新节点对应的 1 套目录:
$ mkdir -pv /mongodb/38017/{conf,log}
2、修改配置:
$ cat > /mongodb/38017/conf/mongos.conf <<EOF
systemLog:
  destination: file
  path: /mongodb/38017/log/mongos.log
  logAppend: true
net:
  bindIp: 10.0.1.51,127.0.0.1
  port: 38017
# 指定 config servers 服务地址,这里 config servers 是一个配置集
sharding:
  configDB: configReplSet/10.0.1.51:38018,10.0.1.51:38019,10.0.1.51:38020
processManagement:
  fork: true
EOF
3、配置实例被 systemd 管理:
$ cat << EOF > /etc/systemd/system/mongos38017.service
[Unit]
Description=mongodb
After=network.target remote-fs.target nss-lookup.target
[Service]
User=mongod
Type=forking
ExecStart=/mongodb/bin/mongos --config /mongodb/38017/conf/mongos.conf
ExecReload=/bin/kill -s HUP
ExecStop=/bin/kill -2 \$MAINPID
PrivateTmp=true
[Install]
WantedBy=multi-user.target
EOF
4、启动 mongos 并检查占用端口:
$ systemctl start mongod38017.service
# 此时应该有如下 10 个实例启动并占用如下 10 个端口
$ ss -tanl | grep 380
LISTEN     0      128    127.0.0.1:38017                    *:*
LISTEN     0      128    10.0.1.51:38017                    *:*
LISTEN     0      128    127.0.0.1:38018                    *:*
LISTEN     0      128    10.0.1.51:38018                    *:*
LISTEN     0      128    127.0.0.1:38019                    *:*
LISTEN     0      128    10.0.1.51:38019                    *:*
LISTEN     0      128    127.0.0.1:38020                    *:*
LISTEN     0      128    10.0.1.51:38020                    *:*
LISTEN     0      128    127.0.0.1:38021                    *:*
LISTEN     0      128    10.0.1.51:38021                    *:*
LISTEN     0      128    127.0.0.1:38022                    *:*
LISTEN     0      128    10.0.1.51:38022                    *:*
LISTEN     0      128    127.0.0.1:38023                    *:*
LISTEN     0      128    10.0.1.51:38023                    *:*
LISTEN     0      128    127.0.0.1:38024                    *:*
LISTEN     0      128    10.0.1.51:38024                    *:*
LISTEN     0      128    127.0.0.1:38025                    *:*
LISTEN     0      128    10.0.1.51:38025                    *:*
LISTEN     0      128    127.0.0.1:38026                    *:*
LISTEN     0      128    10.0.1.51:38026                    *:*
添加分片
登录到 mongos 做如下操作:
$ mongo 10.0.1.51:38017/admin
MongoDB shell version v3.6.12
connecting to: mongodb://10.0.1.51:38017/admin?gssapiServiceName=mongodb
...
# 添加分片
mongos> db.runCommand( { addshard : "sh1/10.0.1.51:38021,10.0.1.51:38022,10.0.1.51:38023",name:"shard1"} )
mongos> db.runCommand( { addshard : "sh2/10.0.1.51:38024,10.0.1.51:38025,10.0.1.51:38026",name:"shard2"} )
# 列出分片
mongos> db.runCommand( { listshards : 1 } )
{
	"shards" : [
		{
			"_id" : "shard1",
			"host" : "sh1/10.0.1.51:38021,10.0.1.51:38022",
			"state" : 1
		},
		{
			"_id" : "shard2",
			"host" : "sh2/10.0.1.51:38024,10.0.1.51:38025",
			"state" : 1
		}
	],
	"ok" : 1,
...
# 查看整体状态
mongos> sh.status()
--- Sharding Status ---
  sharding version: {
  	"_id" : 1,
  	"minCompatibleVersion" : 5,
  	"currentVersion" : 6,
  	"clusterId" : ObjectId("5eeadfd575d6ab5630af9ddf")
  }
  shards:
        {  "_id" : "shard1",  "host" : "sh1/10.0.1.51:38021,10.0.1.51:38022",  "state" : 1 }
        {  "_id" : "shard2",  "host" : "sh2/10.0.1.51:38024,10.0.1.51:38025",  "state" : 1 }
  active mongoses:
        "3.6.12" : 1
  autosplit:
        Currently enabled: yes
  balancer:
        Currently enabled:  yes
        Currently running:  no
        Failed balancer rounds in last 5 attempts:  0
        Migration Results for the last 24 hours:
                No recent migrations
  databases:
        {  "_id" : "config",  "primary" : "config",  "partitioned" : true }
使用分片集群
range 分片
下面的操作是在登入 mongos 服务后进行的(
mongo --port 38017 admin)。
1、激活 test 库的分片功能:
# 语法:db.runCommand( { enablesharding : "<库名>" } )
mongos> db.runCommand( { enablesharding : "test" } )
2、为 vast 集合指定分片键并启用分片功能:
mongos> use test
# 为 id 属性设置索引
mongos> db.vast.ensureIndex( { id: 1 } )
# 为指定集合启用分片功能,分片键为 id 属性。1 表示将数据以从小到大的顺序分布,-1 表示将数据以从大到小的顺序分布
mongos> use admin
mongos> db.runCommand( { shardcollection : "test.vast",key : {id: 1} } )
3、录入测试数据:
mongos> use test
# 录入 100w 条数据,非常慢
mongos> for(i=1;i<1000000;i++){ db.vast.insert({"id":i,"name":"shenzheng","age":70,"date":new Date()}); }
4、验证分片结果:
# 登入 shard1 检查 vast 集合的 doc 数
$ mongo --port 38021
MongoDB shell version v3.6.12
connecting to: mongodb://127.0.0.1:38021/?gssapiServiceName=mongodb
...
sh1:PRIMARY> use test
sh1:PRIMARY> db.vast.count();
500001

# 登入 shard2 检查 vast 集合的 doc 数
$ mongo --port 38025
MongoDB shell version v3.6.12
connecting to: mongodb://127.0.0.1:38025/?gssapiServiceName=mongodb
sh2:PRIMARY> use test
sh2:PRIMARY> db.vast.count()
499998
5、查看分片状态:
mongos> sh.status()
...
        {  "_id" : "test",  "primary" : "shard2",  "partitioned" : true }
                test.vast
                        shard key: { "id" : 1 }
                        unique: false
                        balancing: true
                        chunks:
                                shard1	2
                                shard2	2
                        { "id" : { "$minKey" : 1 } } -->> { "id" : 2 } on : shard1 Timestamp(2, 0)
                        { "id" : 2 } -->> { "id" : 500002 } on : shard1 Timestamp(3, 0)
                        { "id" : 500002 } -->> { "id" : 750003 } on : shard2 Timestamp(3, 1)
                        { "id" : 750003 } -->> { "id" : { "$maxKey" : 1 } } on : shard2 Timestamp(1, 4)
...
当分片策略为 range 时,在录入数据的过程中,有一个分片是一直没有数据的,一直到主分片数据插入完毕后,另一个分片才会开始同步数据。
hash 分片
下面的操作是在登入 mongos 服务后进行的(
mongo --port 38017 admin)。
1、激活 student 库的分片功能:
# 语法:db.runCommand( { enablesharding : "<库名>" } )
mongos> db.runCommand( { enablesharding : "student" } )
2、为 vast 集合指定分片键并启用分片功能:
mongos> use student
# 为 id 属性设置哈希索引
mongos> db.vast.ensureIndex( { id: "hashed" } )
# 为指定集合启用分片功能,分片键为 id 属性。1 表示将数据以从小到大的顺序分布,-1 表示将数据以从大到小的顺序分布
mongos> use admin
mongos> db.runCommand( { shardcollection : "student.vast",key : {id: "hashed"} } )
3、录入测试数据:
mongos> use student
# 录入 100w 条数据,非常慢
mongos> for(i=1;i<1000000;i++){ db.vast.insert({"id":i,"name":"shenzheng","age":70,"date":new Date()}); }
4、验证分片结果:
# 登入 shard1 检查 vast 集合的 doc 数
$ mongo --port 38021
MongoDB shell version v3.6.12
connecting to: mongodb://127.0.0.1:38021/?gssapiServiceName=mongodb
...
sh1:PRIMARY> use student
sh1:PRIMARY> db.vast.count()
19128

# 登入 shard2 检查 vast 集合的 doc 数
$ mongo --port 38025
MongoDB shell version v3.6.12
connecting to: mongodb://127.0.0.1:38025/?gssapiServiceName=mongodb
sh2:PRIMARY> use student
sh2:PRIMARY> db.vast.count()
34375
5、查看分片状态:
mongos> sh.status()
...
        {  "_id" : "student",  "primary" : "shard1",  "partitioned" : true }
                student.vast
                        shard key: { "id" : "hashed" }
                        unique: false
                        balancing: true
                        chunks:
                                shard1	2
                                shard2	2
                        { "id" : { "$minKey" : 1 } } -->> { "id" : NumberLong("-4611686018427387902") } on : shard1 Timestamp(2, 2)
                        { "id" : NumberLong("-4611686018427387902") } -->> { "id" : NumberLong(0) } on : shard1 Timestamp(2, 3)
                        { "id" : NumberLong(0) } -->> { "id" : NumberLong("4611686018427387902") } on : shard2 Timestamp(2, 4)
                        { "id" : NumberLong("4611686018427387902") } -->> { "id" : { "$maxKey" : 1 } } on : shard2 Timestamp(2, 5)
...
当分片策略为 hash 时,在录入数据的过程中,数据会直接根据 hash 值均匀录入到对应的分片,省去了后续 balancer 调度的部分。
管理操作
分片管理
分片集群的常用管理操作如下:
# 判断是否是分片集群
mongos> db.runCommand({ isdbgrid : 1})

# 列出所有分片信息,需 use 到 admin 库下执行
mongos> use admin
mongos> db.runCommand({ isdbgrid : 1})

# 列出开启分片功能的数据库,需 use 到 config 库下执行
mongos> use config
mongos> db.databases.find( { "partitioned": true } )
# 不加参数则是列出所有数据库的分片情况
mongos> db.databases.find()

# 查看集合的分片键,需 use 到 config 库下执行
mongos> use config
mongos> db.collections.find().pretty()

# 查看分片的详细信息
mongos> sh.status()
# 或:
mongos> db.printShardingStatus()

# 删除和添加分片节点,需 use 到 admin 库下执行
mongos> use admin
# 确认 balancer 是否在工作
mongos> sh.getBalancerState()
true
# 删除 shard2 节点,谨慎操作!!!一定会触发 balancer 工作
mongos> db.runCommand( { removeShard: "shard2" } )
# 重新添加分片
mongos> db.runCommand( { addshard : "sh2/10.0.1.51:38024,10.0.1.51:38025,10.0.1.51:38026",name:"shard2"} )
balancer 管理
前面有提到过,mongos 自带了一个特别重要的组件,那就是 balancer,它的作用是自动巡查所有 shard 节点上的 chunk 的情况,自动做 chunk 迁移,以保证数据均匀的存储在各个节点。
balancer 有几个特定的工作时机,如下:
- 自动运行,会检测系统不繁忙的时候做迁移;
- 在做节点删除的时候,立即开始迁移工作;
- 在预设定的时间窗口(其实就是设定的一个时间段)内运行;
balancer 的常用管理操作有如下:
# 关闭 balancer,在备份时一般需要关闭它
mongos> sh.stopBalancer()
# 启动 balancer
mongos> sh.startBalancer()

# 启动 balancer,需要 use 到 config 库下
mongos> use config
mongos> sh.setBalancerState( true )
# 设置 balancer 工作的时间窗口为凌晨 3:00 到 5:00
mongos> db.settings.update({ _id : "balancer" }, { $set : { activeWindow : { start : "3:00", stop : "5:00" } } }, true )

# 查看设定的时间窗口,也可通过 sh.status() 查看
mongos> sh.getBalancerWindow()

# 关闭某个集合的 balancer 功能
mongos> sh.disableBalancing("<库名>.<集合名>")
# 打开某个集合的 balancer 功能
mongos> sh.enableBalancing("<库名>.<集合名>")

# 确定某个集合的 balancer 是开启或者关闭,如果返回值为 false,则说明开启了 balancer
mongos> db.getSiblingDB("config").collections.findOne({_id : "test.vast"}).noBalance
评论区