-de8bd8f33c3e44a59907dafe1884f228.png)


主机规划
我这里准备如下三台机器:
| IP | OS |
|---|---|
| 10.0.1.111 | Ubuntu 18.04 |
| 10.0.1.112 | Ubuntu 18.04 |
| 10.0.1.113 | Ubuntu 18.04 |
下述所有操作如未注明操作主机则需要在所有机器上执行。
资源下载
下载 Perconna XtraDB Cluster 8.0 的 deb 包:
$ wget https://downloads.percona.com/downloads/Percona-XtraDB-Cluster-LATEST/Percona-XtraDB-Cluster-8.0.20-11.3/binary/debian/bionic/x86_64/Percona-XtraDB-Cluster-8.0.20-r5-bionic-x86_64-bundle.tar
下载依赖的 deb 包:
$ wget https://repo.percona.com/apt/percona-release_latest.$(lsb_release -sc)_all.deb
$ dpkg -i percona-release_latest.bionic_all.deb
$ apt update
$ apt download qpress
安装
解压并使用 apt 执行本地安装操作:
$ tar xf Percona-XtraDB-Cluster-8.0.20-r5-bionic-x86_64-bundle.tar
$ apt install ./*.deb -y
安装过程中会提示配置 root 用户密码:

重复输入两次后需要选择认证插件:
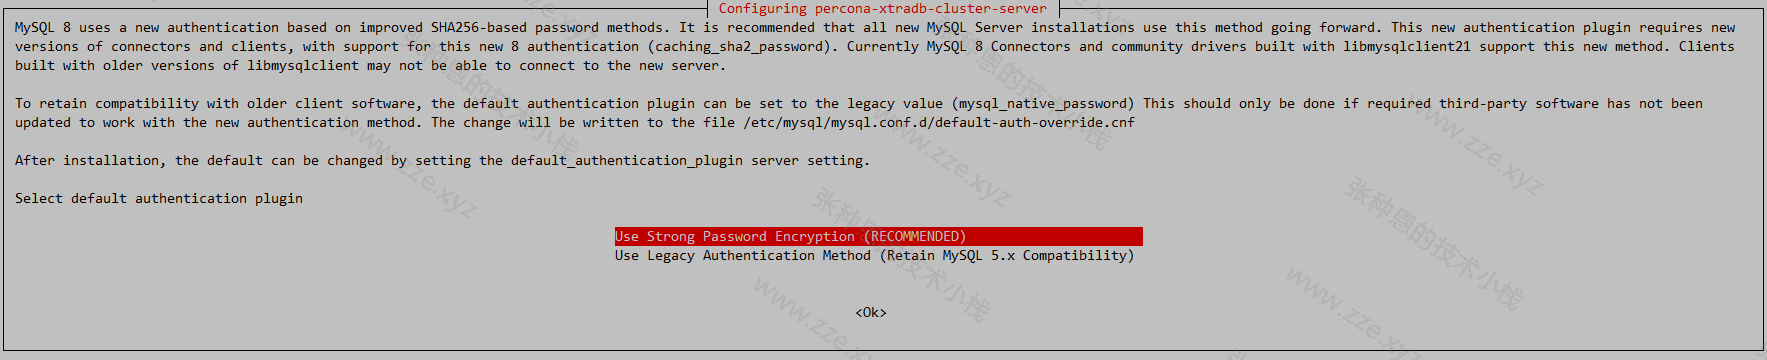
回车后等待片刻即可安装完成。
初始化
仅在主机 10.0.1.111 执行。
启动服务:
$ systemctl start mysql
安全初始化:
$ mysql_secure_installation

Securing the MySQL server deployment.

Enter password for user root:

VALIDATE PASSWORD COMPONENT can be used to test passwords
and improve security. It checks the strength of password
and allows the users to set only those passwords which are
secure enough. Would you like to setup VALIDATE PASSWORD component?

Press y|Y for Yes, any other key for No: y

There are three levels of password validation policy:

LOW    Length >= 8
MEDIUM Length >= 8, numeric, mixed case, and special characters
STRONG Length >= 8, numeric, mixed case, special characters and dictionary file

Please enter 0 = LOW, 1 = MEDIUM and 2 = STRONG: 2
Using existing password for root.

Estimated strength of the password: 25
Change the password for root ? ((Press y|Y for Yes, any other key for No) : n

 ... skipping.
By default, a MySQL installation has an anonymous user,
allowing anyone to log into MySQL without having to have
a user account created for them. This is intended only for
testing, and to make the installation go a bit smoother.
You should remove them before moving into a production
environment.

Remove anonymous users? (Press y|Y for Yes, any other key for No) : y
Success.


Normally, root should only be allowed to connect from
'localhost'. This ensures that someone cannot guess at
the root password from the network.

Disallow root login remotely? (Press y|Y for Yes, any other key for No) : y
Success.

By default, MySQL comes with a database named 'test' that
anyone can access. This is also intended only for testing,
and should be removed before moving into a production
environment.


Remove test database and access to it? (Press y|Y for Yes, any other key for No) : y
 - Dropping test database...
Success.

 - Removing privileges on test database...
Success.

Reloading the privilege tables will ensure that all changes
made so far will take effect immediately.

Reload privilege tables now? (Press y|Y for Yes, any other key for No) : y
Success.

All done!
停止 MySQL 服务:
$ systemctl stop mysql
配置
主机 10.0.1.111 修改部分:
$ vim /etc/mysql/mysql.conf.d/mysqld.cnf
server-id=1
wsrep_cluster_address=gcomm://10.0.1.111,10.0.1.112,10.0.1.113
wsrep_node_address=10.0.1.111
wsrep_node_name=db1
# 关闭证书认证
pxc-encrypt-cluster-traffic=OFF
主机 10.0.1.112 修改部分:
$ vim /etc/mysql/mysql.conf.d/mysqld.cnf
server-id=2
wsrep_cluster_address=gcomm://10.0.1.111,10.0.1.112,10.0.1.113
wsrep_node_address=10.0.1.112
wsrep_node_name=db2
# 关闭证书认证
pxc-encrypt-cluster-traffic=OFF
主机 10.0.1.113 修改部分:
$ vim /etc/mysql/mysql.conf.d/mysqld.cnf
server-id=3
wsrep_cluster_address=gcomm://10.0.1.111,10.0.1.112,10.0.1.113
wsrep_node_address=10.0.1.113
wsrep_node_name=db3
# 关闭证书认证
pxc-encrypt-cluster-traffic=OFF
启动集群
主机 10.0.1.111 以引导模式启动:
$ systemctl start mysql@bootstrap
主机 10.0.1.112 和 10.0.1.113 正常启动:
$ systemctl start mysql
检查
随便登入一台机器的 MySQL 检查集群状态:
$ mysql -uroot -pxxx
mysql> show status like 'wsrep_cluster%';
+----------------------------+--------------------------------------+
| Variable_name              | Value                                |
+----------------------------+--------------------------------------+
| wsrep_cluster_weight       | 3                                    |
| wsrep_cluster_capabilities |                                      |
| wsrep_cluster_conf_id      | 3                                    |
| wsrep_cluster_size         | 3                                    |
| wsrep_cluster_state_uuid   | 9bf4649d-4651-11eb-a610-8ba866546729 |
| wsrep_cluster_status       | Primary                              |
+----------------------------+--------------------------------------+
6 rows in set (0.00 se
创建测试库与表:
$ mysql -uroot -pxxx
...
mysql> create database test;
Query OK, 1 row affected (0.05 sec)

mysql> use test
Database changed
mysql> create table t1(id int primary key, name varchar(24));
Query OK, 0 rows affected (0.12 sec)
登入另外两台机器的 MySQL 实例检查测试库与表是否同步:
$ mysql -uroot -pxxx
...
mysql> show databases;
+--------------------+
| Database           |
+--------------------+
| information_schema |
| mysql              |
| performance_schema |
| sys                |
| test               |
+--------------------+
5 rows in set (0.01 sec)

mysql> use test;

Database changed
mysql> show tables;
+----------------+
| Tables_in_test |
+----------------+
| t1             |
+----------------+
1 row in set (0.00 sec)
评论区