生成工程
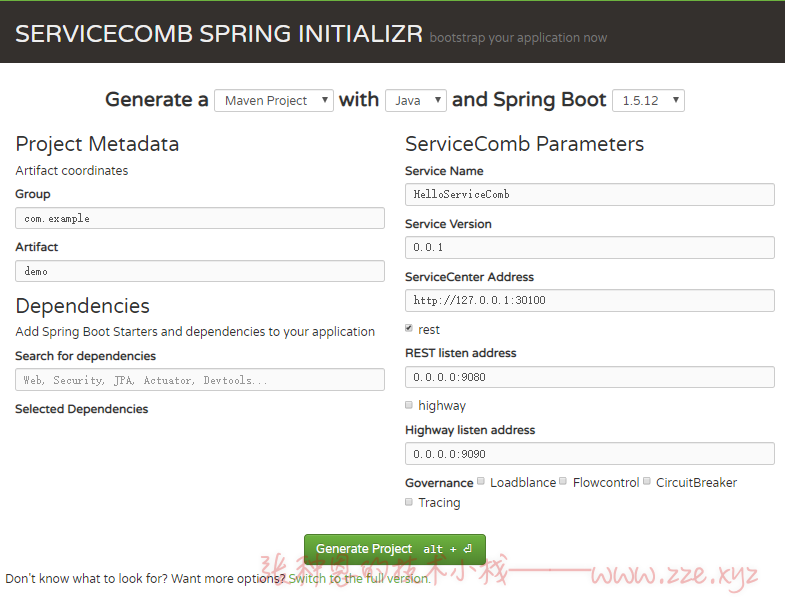
为了能够使开发者可以快速构建 ServiceComb 应用程序,它同 SpringBoot 类似也为我们提供了一套脚手架,这样能够方便学习者及应用开发者快速入门,同时极大的提高了效率。
访问快速开发引导页 http://start.servicecomb.io/:

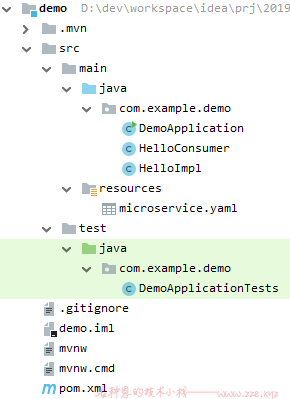
默认生成的工程压缩包解压并导入 IDEA 后结构如下:

工程分析
依赖
查看 pom.xml 文件:
<!--SpringBoot 父工程-->
<parent>
	<groupId>org.springframework.boot</groupId>
	<artifactId>spring-boot-starter-parent</artifactId>
	<version>1.5.12.RELEASE</version>
	<relativePath/> <!-- lookup parent from repository -->
</parent>
<dependencies>
	<!--Hibernate 校验依赖-->
	<dependency>
		<groupId>org.hibernate</groupId>
		<artifactId>hibernate-validator</artifactId>
	</dependency>
	<!--SpringBoot 依赖-->
	<dependency>
		<groupId>org.springframework.boot</groupId>
		<artifactId>spring-boot-starter</artifactId>
	</dependency>
	<!--SpringBoot 整合 ServiceComb 依赖-->
	<dependency>
		<groupId>org.apache.servicecomb</groupId>
		<artifactId>spring-boot-starter-provider</artifactId>
	</dependency>
	<!--单元测试依赖-->
	<dependency>
		<groupId>org.springframework.boot</groupId>
		<artifactId>spring-boot-starter-test</artifactId>
		<scope>test</scope>
	</dependency>
</dependencies>
<!--导入另一个 pom 文件中的依赖-->
<dependencyManagement>
	<dependencies>
		<dependency>
			<groupId>org.apache.servicecomb</groupId>
			<artifactId>java-chassis-dependencies</artifactId>
			<version>1.2.1</version>
			<type>pom</type>
			<scope>import</scope>
		</dependency>
	</dependencies>
</dependencyManagement>
会发现该工程继承了 SpringBoot 父工程,即该工程也是一个 SpringBoot 工程。
配置文件
ServiceComb 默认使用的配置文件为 microservice.yaml 文件,大致说明如下:
APPLICATION_ID: start.servicecomb.io # 当前服务标识
service_description:
  name: HelloServiceComb # 当前服务名称
  version: 0.0.1 # 当前服务版本号
servicecomb:
  handler:
    chain:
      Provider: {}
  rest:
    address: 0.0.0.0:9080 # Rest 地址,用于真正访问微服务
  service:
    registry:
      address: http://127.0.0.1:30100 # 注册中心地址
      autodiscovery: false # 是否自动发现
服务提供者
在 Demo 工程中有一个示例服务提供者,就是 HelloImpl 类,看下:
package com.example.demo;

import org.apache.servicecomb.provider.rest.common.RestSchema;
import org.springframework.web.bind.annotation.GetMapping;
import org.springframework.web.bind.annotation.RequestMapping;

@RestSchema(schemaId = "hello") // 标识微服务提供者
@RequestMapping(path = "/")
public class HelloImpl {

    @GetMapping(path = "/hello")
    public String hello() {
        return "Hello World!";
    }
}
服务消费者
上面有了服务提供者,还有与之对应的服务消费者,就是 HelloConsumer 类,如下:
package com.example.demo;

import org.apache.servicecomb.provider.springmvc.reference.RestTemplateBuilder;
import org.springframework.web.client.RestTemplate;

public class HelloConsumer {
    // RestTemplate 用于快速请求微服务,RestTemplateBuilder 是由 ServiceComb 提供。
    private final RestTemplate restTemplate = RestTemplateBuilder.create();

    public void invokeHello() {
        //service url is : cse://serviceName/operation

        // 对应 microservice.yaml 中的服务名称 service_description.name
        String serviceName = "HelloServiceComb";
        // cse:// 表示使用服务注册中心提供的协议,服务注册中心地址在 microservice.yaml 中已配置
        // /hello 对应微服务提供者 HelloImpl.hello() 上标注的映射地址
        restTemplate.getForObject("cse://" + serviceName + "/hello", String.class);
    }
}
SpringBoot引导类
上面已经说了该工程实际上是一个 SpringBoot 工程,所以它也有 SpringBoot 的启动引导类,就是 DemoApplication 类,如下:
package com.example.demo;

import org.springframework.boot.SpringApplication;
import org.springframework.boot.autoconfigure.SpringBootApplication;
import org.apache.servicecomb.springboot.starter.provider.EnableServiceComb;

@SpringBootApplication
@EnableServiceComb
public class DemoApplication {

  public static void main(String[] args) {
    SpringApplication.run(DemoApplication.class, args);
  }
}
启动效果
与 SpringBoot 工程的启动相同,直接执行引导启动类即可,要注意的是启动前注册中心的服务也要启动起来哦。
启动完成后,访问 127.0.0.1:9080:

-de8bd8f33c3e44a59907dafe1884f228.png)


评论区