-de8bd8f33c3e44a59907dafe1884f228.png)


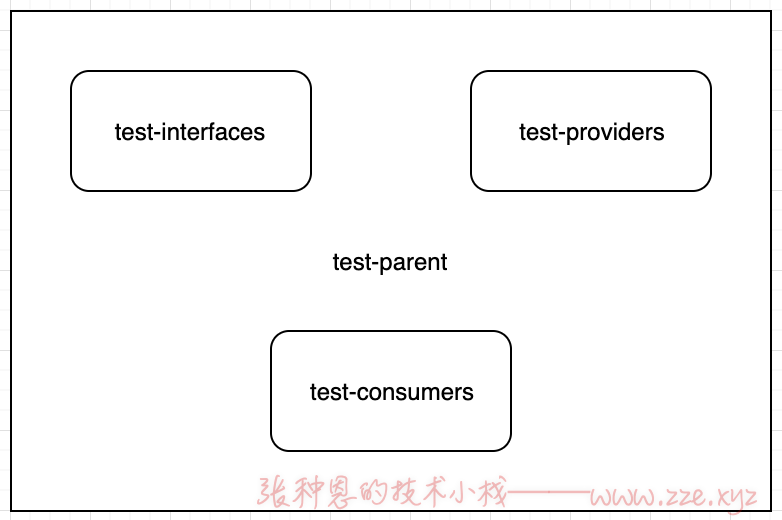
工程架构
创建四个 Maven 工程:
- 父工程
test-parent; - 接口子工程
test-interfaces; - 提供者子工程
test-providers; - 消费者子工程
test-consumers;
如下图:
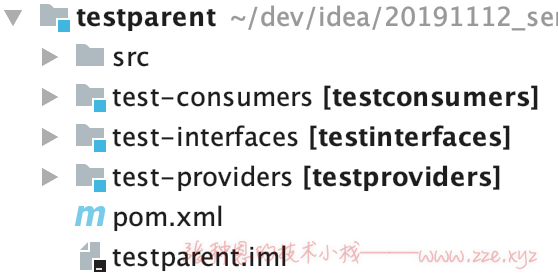
在 IDEA 中创建完成后结构如下:
工程详细
父工程
父工程依赖如下:
<?xml version="1.0" encoding="UTF-8"?>

<project xmlns="http://maven.apache.org/POM/4.0.0" xmlns:xsi="http://www.w3.org/2001/XMLSchema-instance"
         xsi:schemaLocation="http://maven.apache.org/POM/4.0.0 http://maven.apache.org/xsd/maven-4.0.0.xsd">
    <modelVersion>4.0.0</modelVersion>

    <groupId>xyz.zze.servicecomb</groupId>
    <artifactId>test-parent</artifactId>
    <version>1.0-SNAPSHOT</version>
    <modules>
        <module>test-interfaces</module>
        <module>test-providers</module>
        <module>test-consumers</module>
    </modules>
    <packaging>pom</packaging>

    <parent>
        <groupId>org.springframework.boot</groupId>
        <artifactId>spring-boot-starter-parent</artifactId>
        <version>1.5.12.RELEASE</version>
        <relativePath/> <!-- lookup parent from repository -->
    </parent>

    <properties>
        <project.build.sourceEncoding>UTF-8</project.build.sourceEncoding>
        <project.reporting.outputEncoding>UTF-8</project.reporting.outputEncoding>
        <java.version>1.8</java.version>
    </properties>

    <dependencyManagement>
        <dependencies>
            <dependency>
                <groupId>org.apache.servicecomb</groupId>
                <artifactId>java-chassis-dependencies</artifactId>
                <version>1.2.1</version>
                <type>pom</type>
                <scope>import</scope>
            </dependency>
        </dependencies>
    </dependencyManagement>

    <build>
        <plugins>
            <plugin>
                <groupId>org.springframework.boot</groupId>
                <artifactId>spring-boot-maven-plugin</artifactId>
            </plugin>
        </plugins>
    </build>
</project>
接口子工程
创建如下接口:
package xyz.zze.servicecomb.service;

public interface HelloService {
    public String sayHello(String name);
}
提供者子工程
依赖
<?xml version="1.0" encoding="UTF-8"?>
<project xmlns="http://maven.apache.org/POM/4.0.0"
         xmlns:xsi="http://www.w3.org/2001/XMLSchema-instance"
         xsi:schemaLocation="http://maven.apache.org/POM/4.0.0 http://maven.apache.org/xsd/maven-4.0.0.xsd">
    <parent>
        <artifactId>test-parent</artifactId>
        <groupId>xyz.zze.servicecomb</groupId>
        <version>1.0-SNAPSHOT</version>
    </parent>
    <modelVersion>4.0.0</modelVersion>

    <artifactId>test-providers</artifactId>

    <dependencies>
        <dependency>
            <groupId>org.hibernate</groupId>
            <artifactId>hibernate-validator</artifactId>
        </dependency>

        <dependency>
            <groupId>org.springframework.boot</groupId>
            <artifactId>spring-boot-starter</artifactId>
        </dependency>
        <dependency>
            <groupId>org.apache.servicecomb</groupId>
            <artifactId>spring-boot-starter-provider</artifactId>
        </dependency>

        <dependency>
            <groupId>xyz.zze.servicecomb</groupId>
            <artifactId>test-interfaces</artifactId>
            <version>1.0-SNAPSHOT</version>
        </dependency>
    </dependencies>
</project>
服务实现类
package xyz.zze.servicecomb.service.impl;

import org.apache.servicecomb.provider.rest.common.RestSchema;
import org.springframework.web.bind.annotation.GetMapping;
import org.springframework.web.bind.annotation.RequestMapping;
import xyz.zze.servicecomb.service.HelloService;

@RestSchema(schemaId = "hello")
@RequestMapping(path = "/")
public class HelloServiceImpl implements HelloService {
    @GetMapping(path = "/hello")
    @Override
    public String sayHello(String name) {
        return "hello "+ name;
    }
}
配置文件
在 classpath 下创建配置文件 microservice.yaml:
APPLICATION_ID: test-service
service_description:
  name: helloServiceProvider
  version: 0.0.1
servicecomb:
  handler:
    chain:
      Provider: {}
  rest:
    address: 0.0.0.0:9080
  service:
    registry:
      address: http://127.0.0.1:30100
      autodiscovery: false
启动类
创建工程启动类:
package xyz.zze.servicecomb.service;

import org.apache.servicecomb.springboot.starter.provider.EnableServiceComb;
import org.springframework.boot.SpringApplication;
import org.springframework.boot.autoconfigure.SpringBootApplication;

@SpringBootApplication
@EnableServiceComb
public class TestProviderApplication {

    public static void main(String[] args) {
        SpringApplication.run(TestProviderApplication.class, args);
    }
}
消费者子工程
依赖
<?xml version="1.0" encoding="UTF-8"?>
<project xmlns="http://maven.apache.org/POM/4.0.0"
         xmlns:xsi="http://www.w3.org/2001/XMLSchema-instance"
         xsi:schemaLocation="http://maven.apache.org/POM/4.0.0 http://maven.apache.org/xsd/maven-4.0.0.xsd">
    <parent>
        <artifactId>test-parent</artifactId>
        <groupId>xyz.zze.servicecomb</groupId>
        <version>1.0-SNAPSHOT</version>
    </parent>
    <modelVersion>4.0.0</modelVersion>

    <artifactId>test-consumers</artifactId>

    <dependencies>
        <dependency>
            <groupId>org.hibernate</groupId>
            <artifactId>hibernate-validator</artifactId>
        </dependency>

        <dependency>
            <groupId>org.springframework.boot</groupId>
            <artifactId>spring-boot-starter</artifactId>
        </dependency>
        <dependency>
            <groupId>org.apache.servicecomb</groupId>
            <artifactId>spring-boot-starter-provider</artifactId>
        </dependency>

        <dependency>
            <groupId>xyz.zze.servicecomb</groupId>
            <artifactId>test-interfaces</artifactId>
            <version>1.0-SNAPSHOT</version>
        </dependency>
    </dependencies>
</project>
服务实现类
创建服务实现类,这里的服务实现类实际上是通过调用提供者服务实现,如下:
package xyz.zze.servicecomb.service.impl;

import org.apache.servicecomb.provider.springmvc.reference.RestTemplateBuilder;
import org.springframework.stereotype.Service;
import org.springframework.web.client.RestTemplate;
import xyz.zze.servicecomb.service.HelloService;

@Service
public class HelloServiceImpl implements HelloService {

    private final RestTemplate restTemplate = RestTemplateBuilder.create();

    @Override
    public String sayHello(String name) {
        String providerName = "helloServiceProvider";
        return restTemplate.getForObject("cse://" + providerName + "/hello?name="+name, String.class);
    }
}
对外控制器
创建消费者子工程对外暴露的控制器:
package xyz.zze.servicecomb.controller;

import org.apache.servicecomb.provider.rest.common.RestSchema;
import org.springframework.beans.factory.annotation.Autowired;
import org.springframework.web.bind.annotation.GetMapping;
import org.springframework.web.bind.annotation.RequestMapping;
import xyz.zze.servicecomb.service.HelloService;

@RestSchema(schemaId = "testHello")
@RequestMapping("/")
public class HelloController {

    @Autowired
    private HelloService helloService;

    @GetMapping("/hello")
    public String hello(String name) {
        String result = helloService.sayHello(name);
        return result;
    }
}
配置文件
在 classpath 下创建配置文件 microservice.yaml:
APPLICATION_ID: test-service
service_description:
  name: helloServiceConsumer
  version: 0.0.1
servicecomb:
  handler:
    chain:
      Provider: {}
  rest:
    address: 0.0.0.0:9081
  service:
    registry:
      address: http://127.0.0.1:30100
      autodiscovery: false
注意,消费者服务的
APPLICATION_ID要与所消费的提供者服务的相同。
启动类
创建工程启动类:
package xyz.zze.servicecomb;

import org.apache.servicecomb.springboot.starter.provider.EnableServiceComb;
import org.springframework.boot.SpringApplication;
import org.springframework.boot.autoconfigure.SpringBootApplication;

@SpringBootApplication
@EnableServiceComb
public class TestConsumerApplication {

    public static void main(String[] args) {
        SpringApplication.run(TestConsumerApplication.class, args);
    }
}
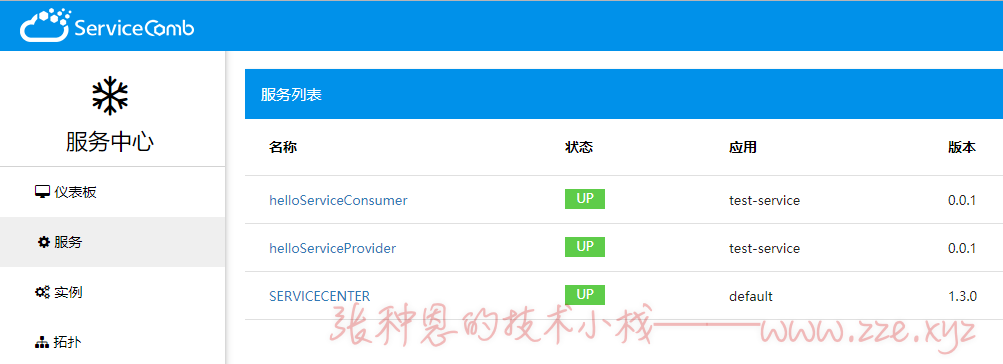
测试
分别启动提供者服务和消费者服务,访问消费者服务 localhost:9081/hello?name=zhangsan:

显示如上则表示调用消费者服务成功。
此时也可通过服务注册中心的前端工具查看到注册的提供者和消费者服务,如下:
并且在消费者服务下能看到对应的提供者服务:

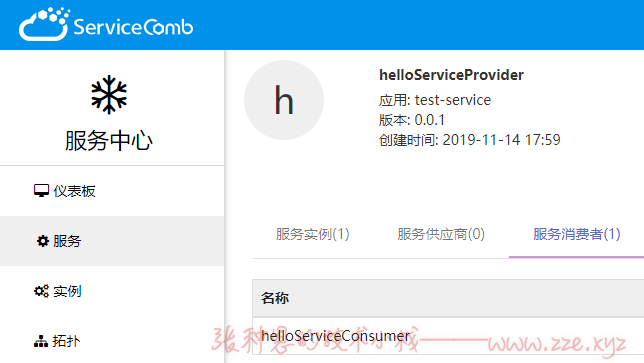
在提供者服务下也能看到对应的消费者服务:
评论区