Thymeleaf 介绍
Thymeleaf 是一种用于 Web 和独立环境的现代服务器端的 Java 模板引擎。
Thymeleaf 的主要目标是将优雅的自然模板带到开发工作流程中,并将 HTML 在浏览器中正确显示,并且可以作为静态原型,让开发团队能更容易地协作。Thymeleaf 能够处理 HTML,XML,JavaScript,CSS 甚至纯文本。
Thymeleaf 使用 Spring 框架的模块,与许多常见的工具集成在一起,并且可以插入自己的功能,是现代 HTML5 JVM Web 开发的理想选择,尽管 Thymeleaf 还有更多其它的功能。
Thymeleaf 建立在自然模板的概念之上,以不影响模板作为设计原型的方式将其逻辑注入到模板文件中。 这改善了设计沟通,弥合了前端设计和开发人员之间的理解偏差。
关注文章首部微信公众号发送
#97_thymeleaf_doc获取 Thymeleaf 中文离线文档 | Thymeleaf 官网
SpringBoot 中使用 Thymeleaf
准备
引入
Thymeleaf 是 SpringBoot 推荐使用的一款模板引擎框架,要引入很简单,SpringBoot 为它提供了场景启动器:
<dependency>
    <groupId>org.springframework.boot</groupId>
    <artifactId>spring-boot-starter-thymeleaf</artifactId>
</dependency>
切换版本
如 SpringBoot 1.5.19 版本使用的 Thymeleaf 版本默认为 2.1.6,如果想切换到 3.0 以上,直接覆盖它的版本定义属性即可,要注意的是需要同时更新它的布局功能支持程序的版本:
<thymeleaf.version>3.0.2.RELEASE</thymeleaf.version>
<!--布局功能支持程序,thymeleaf 使用 3.0 版本以上时支持程序要使用 2.0 以上-->
<thymeleaf-layout-dialect.version>2.1.1</thymeleaf-layout-dialect.version>
入门程序
分析
可以先看下 SpringBoot 中 Thymeleaf 的自动配置类:
@Configuration
@EnableConfigurationProperties(ThymeleafProperties.class)
@ConditionalOnClass(SpringTemplateEngine.class)
@AutoConfigureAfter(WebMvcAutoConfiguration.class)public class ThymeleafAutoConfiguration {
查看它的属性配置类:
@ConfigurationProperties(prefix = "spring.thymeleaf")
public class ThymeleafProperties {
    private static final Charset DEFAULT_ENCODING = Charset.forName("UTF-8");
    private static final MimeType DEFAULT_CONTENT_TYPE = MimeType.valueOf("text/html");
    public static final String DEFAULT_PREFIX = "classpath:/templates/";
    public static final String DEFAULT_SUFFIX = ".html";
一目了然,Thymeleaf 默认使用的模板路径为 classpath:/templates/ ,且可省略后缀 .html ,下面我们就开始在 SpringBoot 项目中使用 Thymeleaf。
步骤
1、创建测试控制器:
import org.springframework.stereotype.Controller;
import org.springframework.ui.Model;
import org.springframework.web.bind.annotation.RequestMapping;

@Controller
public class TestController {

    @RequestMapping("test")
    public String test(Model model){
        // 传值
        model.addAttribute("name", "张三");
        // SpringBoot 会找到 classpath:templates/test.html 使用 thymeleaf 渲染
        return "test";
    }
}
2、新建模板页面:
<!-- templates/test.html -->
<!DOCTYPE html>
<html xmlns:th="http://www.thymeleaf.org">
<head>
    <meta charset="UTF-8">
    <title>test</title>
</head>
<body>
<h1 th:text="${name}"></h1>
</body>
</html>
3、测试,启动项目,访问 localhost:8080/test:

表达式
变量表达式
Thymeleaf 的变量表达式类似于 EL 表达式,通过 ${} 取值。
// controller
List<String> nameList = new ArrayList<>();
nameList.add("张三");
nameList.add("李四");
nameList.add("王五");

model.addAttribute("name", "张三");
model.addAttribute("nameList", nameList);
<!-- html -->
<!--取值-->
<span th:text="${name}"></span>
<hr>
<!--循环-->
<ul>
    <li th:each="name : ${nameList}"><span th:text="${name}"/></li>
</ul>

选择变量表达式
与变量表达式很像,不过它需要预先选择一个对象作为上下文变量容器。
// bean
public class User {
    public User(){}
    public User(String name, Integer age) {
        this.name = name;
        this.age = age;
    }

    private String name;

    private Integer age;

    public String getName() {
        return name;
    }

    public void setName(String name) {
        this.name = name;
    }

    public Integer getAge() {
        return age;
    }

    public void setAge(Integer age) {
        this.age = age;
    }
}
// controller
model.addAttribute("user", new User("张三", 18));
<!-- html -->
<div th:object="${user}">
    <p>姓名:<span th:text="*{name}"></span></p>
    <p>年龄:<span th:text="*{age}"></span></p>
</div>
URL 表达式
URL 表达式可以帮助我们更轻松的动态拼装请求 URL。
<!--() 中可以指定要传递的参数-->
<span th:text="@{/order/details(type=1,keyword=ff)}"></span>
表达式支持语法
字面量
文本文字 : 'one text', 'Another one!',…
数字文本 : 0, 34, 3.0, 12.3,…
布尔文本 : true, false
空 : null
文字标记 : one, sometext, main,…
文本操作
字符串连接 : +
文本替换 : |The name is ${name}|
算术运算
二元运算符 : +, -, *, /, %
减号(单目运算符) : -
布尔操作
二元运算符 : and, or
布尔否定(一元运算符) : !, not
比较
比较 : >, <, >=, <= (gt, lt, ge, le)
等值运算符 :==, != (eq, ne)
条件运算
If-then : (if) ? (then)  # 例:<span th:text="${name} == '张三' ? 'Administrator'"/>
If-then-else : (if) ? (then) : (else)  # 例:<span th:text="${name} == '张三' ? 'Administrator' : (${name} ?: 'Unknown')"/>
Default : (value) ?: (defaultvalue)  # 例:<span th:text="${name} ?: 'Unknown'"/>
常用标签属性
| 关键字 | 功能介绍 | 案例 |
|---|---|---|
| th:id | 替换id | <input th:id="'xxx' + ${collect.id}"/> |
| th:text | 文本替换 | <p th:text="${collect.description}">description</p> |
| th:utext | 支持html的文本替换 | <p th:utext="${htmlcontent}">conten</p> |
| th:object | 替换对象 | <div th:object="${session.user}"> |
| th:value | 属性赋值 | <input th:value="${user.name}" /> |
| th:with | 变量赋值运算 | <div th:with="isEven=${prodStat.count}%2==0"></div> |
| th:style | 设置样式 | <span th:style="'display:' + @{(${sitrue} ? 'none' : 'inline-block')} + ''"/> |
| th:onclick | 点击事件 | <button th:onclick="'getCollect()'"></button> |
| th:each | 属性赋值 | <tr th:each="user,userStat:${users}"></tr> |
| th:if | 判断条件 | <a th:if="${userId == collect.userId}" > |
| th:unless | 和th:if判断相反 | <a th:href="@{/login}" th:unless=${session.user != null}>Login</a> |
| th:href | 链接地址 | <a th:href="@{/login}" th:unless=${session.user != null}>Login</a> |
| th:switch | 多路选择 配合th:case 使用 | <div th:switch="${user.role}"> |
| th:case | th:switch的一个分支 | <p th:case="'admin'">User is an administrator</p> |
| th:fragment | 布局标签,定义一个代码片段,方便其它地方引用 | <div th:fragment="alert"> |
| th:include | 布局标签,替换内容到引入的文件 | <head th:include="layout :: htmlhead" th:with="title='xx'"></head> /> |
| th:replace | 布局标签,替换整个标签到引入的文件 | <div th:replace="fragments/header :: title"></div> |
| th:selected | selected选择框 选中 | <option th:selected="(${xxx.id} == ${configObj.dd})"></option> |
| th:src | 图片类地址引入 | <img class="img-responsive" alt="App Logo" th:src="@{/img/logo.png}" /> |
| th:inline | 定义js脚本可以使用变量 | <script type="text/javascript" th:inline="javascript"> |
| th:action | 表单提交的地址 | <form action="subscribe.html" th:action="@{/subscribe}"> |
| th:remove | 删除某个属性 |
1.all:删除包含标签和所有的孩子。2.body:不包含标记删除,但删除其所有的孩子。3.tag:包含标记的删除,但不删除它的孩子。4.all-but-first:删除所有包含标签的孩子,除了第一个。5.none:什么也不做。这个值是有用的动态评估。 |
| th:attr | 设置标签属性,多个属性可以用逗号分隔 | <img th:attr="src=@{/image/aa.jpg},title=#{logo}"/> 此标签不太优雅,一般用的比较少。 |
一个标签内可以包含多个 th:x属性,其生效优先级顺序如下:
include、each、if/unless/switch/case、with、attr、attrprepend、attrappend、value、href、src、etc、text、utext、fragment、remove
常用操作
字符串拼接
<!--使用 + 号-->
<span th:text="'Welcome to our application, ' + ${name} + '!'"/> <br>
<!--使用 | 进行字符串格式化-->
<span th:text="|Welcome to our application, ${name}!|"/>
条件判断
<span th:if="${name}=='张三'">是张三</span>
<span th:unless="${name}=='张三'">不是张三</span>
<span th:text="${name} ?: 'Unknown'"/>
<span th:text="${name} == '张三' ? 'Administrator'"/>
<span th:text="${name} == '张三' ? 'Administrator' : (${name} ?: 'Unknown')"/>
<div th:switch="${name}">
    <span th:case="张三">name 为张三</span>
    <span th:case="李四">name 为李四</span>
</div>
循环
<ul>
    <li th:each="name,iterStat : ${nameList}" th:text="${iterStat.count} + ':'+ ${name}"></li>
</ul>
<!--
iterStat称作状态变量,属性有:
    index:当前迭代对象的index(从0开始计算)
    count: 当前迭代对象的index(从1开始计算)
    size:被迭代对象的大小
    current:当前迭代变量
    even/odd:布尔值,当前循环是否是偶数/奇数(从0开始计算)
    first:布尔值,当前循环是否是第一个
    last:布尔值,当前循环是否是最后一个
-->
组装 URL
<!--() 中可以指定要传递的参数-->
<form th:action="@{/order/details(type=1,keyword=ff)}" ></form>
<!--上述对应的 URL 为 /order/details?type=1&keyword=ff-->
常用内置对象
Thymeleaf 为我们提供了很多内置对象,通过 ${#内置对象名称} 即可访问到,下面列出一些比较常用的:
| 内置对象 | 作用 | 示例 |
|---|---|---|
| dates | 日期操作 | |
| numbers | 数字格式化 | |
| lists | 列表操作 | |
| calendars | 日历操作 | |
| strings | 字符串操作 | |
| objects | 对象操作 | |
| bools | 布尔值操作 | |
| arrays | 数组操作 | |
| sets | 集合操作 | |
| maps | 地图操作 | |
| aggregates | 统计运算 | |
| messages | 属性文件取值 | |
| convertions | 类型转换 | |
| execInfo | 模板信息 | |
| request | 请求对象 | |
| response | 响应对象 | |
| session | 会话对象 | |
布局功能
概述
在 Web 开发中,我们经常会将公共头,公共尾,菜单等部分提取成模板供其它页面使用。在 Thymeleaf 中,通过 th:fragment、th:include、th:replace、参数化模板配置、css 选择器加载代码块等实现。
Spring Boot 2.0 将布局单独提取了出来,需要单独引入依赖:thymeleaf-layout-dialect。
<dependency>
    <groupId>nz.net.ultraq.thymeleaf</groupId>
    <artifactId>thymeleaf-layout-dialect</artifactId>
</dependency>
选择器使用
1、定义模板:
<!-- templates/common/header.html -->
<div class="header">
    这是头部
</div>
<!-- templates/common/body.html -->
<div class="body">
    这是主体
</div>
<!-- templates/common/fotter.html -->
<div class="footer">
    这是尾部
</div>
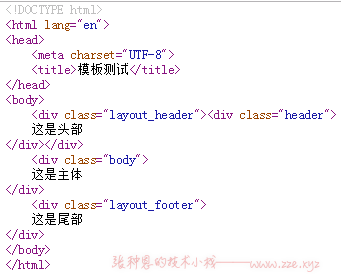
2、引用模板:
<!DOCTYPE html>
<html xmlns:th="http://www.thymeleaf.org">
<head>
    <meta charset="UTF-8">
    <title>模板测试</title>
</head>
<body>
    <!--insert 会将所有选择的标签及内容插入到当前标签内-->
    <div th:insert="common/header :: .header"></div>
    <!--replace 会让选择的标签替换当前的标签-->
    <div th:replace="common/body :: .body"></div>
    <!--include 会将选择的标签内容插入到当前标签内-->
    <div th:include="common/footer :: .footer"></div>
</body>
</html>

fragment 使用
1、定义模板块:
<!-- templates/common/fragment.html -->
<!DOCTYPE html>
<html xmlns:th="http://www.thymeleaf.org">
<head>
    <meta charset="UTF-8">
    <title>fragment Test</title>
</head>
<body>
<!--fragment 定义用于被加载的块-->
<span th:fragment="copy">msg from fragment</span>
<!--定义能接收参数的块-->
<span th:fragment="sayHello(msg, name)">[[|${msg} ${name}|]]</span>
</body>
</html>
2、使用模板块:
<!DOCTYPE html>
<html xmlns:th="http://www.thymeleaf.org">
<head>
    <meta charset="UTF-8">
    <title>模板测试</title>
</head>
<body>
<div th:include="common/fragment::copy"></div>
<div th:include="common/fragment::sayHello('hello','bob')"></div>
</body>
</html>

其中 th:include 、 th:insert 、 th:replace 中的参数格式为 templatename::[domselector] ,其中 templatename 是模板名(如 footer ), domselector 是可选的 dom 选择器。如果只写 templatename ,不写 domselector ,则会加载整个模板。
-de8bd8f33c3e44a59907dafe1884f228.png)


评论区