-de8bd8f33c3e44a59907dafe1884f228.png)


准备
1、使用 Maven 新建 SpringBoot 项目,引入 Rabbit 、Web 场景启动器。
2、配置 RabbitMQ 连接信息:
# application.properties
spring.rabbitmq.host=192.168.202.136
spring.rabbitmq.username=guest
spring.rabbitmq.password=guest
3、注解配置启用 RabbitMQ:
// com.springboot.config.MyAmqpConfig
import org.springframework.amqp.rabbit.annotation.EnableRabbit;
import org.springframework.context.annotation.Configuration;

@Configuration
@EnableRabbit // 启用 Rabbit
public class MyAmqpConfig {

}
4、新建测试 JavaBean:
// com.springboot.bean.User
import java.io.Serializable;
import java.util.Date;

public class User implements Serializable {

    private Integer id;
    private String name;
    private Date birthday;
    private String city;

    public User() {
    }

    public User(Integer id, String name, Date birthday, String city) {
        this.id = id;
        this.name = name;
        this.birthday = birthday;
        this.city = city;
    }

    public Integer getId() {
        return id;
    }

    public void setId(Integer id) {
        this.id = id;
    }

    public String getName() {
        return name;
    }

    public void setName(String name) {
        this.name = name;
    }

    public Date getBirthday() {
        return birthday;
    }

    public void setBirthday(Date birthday) {
        this.birthday = birthday;
    }

    public String getCity() {
        return city;
    }

    public void setCity(String city) {
        this.city = city;
    }

    @Override
    public String toString() {
        return "User{" +
                "id=" + id +
                ", name='" + name + '\'' +
                ", birthday=" + birthday +
                ", city='" + city + '\'' +
                '}';
    }
}
RabbitTemplate 使用
下面通过 RabbitTemplate 来完成上篇文章 RabbitMQ 在可视化界面中的几个测试操作:
import org.junit.Test;
import org.junit.runner.RunWith;
import org.springframework.amqp.rabbit.core.RabbitTemplate;
import org.springframework.beans.factory.annotation.Autowired;
import org.springframework.boot.test.context.SpringBootTest;
import org.springframework.test.context.junit4.SpringRunner;

@RunWith(SpringRunner.class)
@SpringBootTest
public class RabbitTemplateTests {

    // org.springframework.boot.autoconfigure.amqp.RabbitAutoConfiguration 自动配置类中注册了 RabbitTemplate 的 bean
    @Autowired
    private RabbitTemplate rabbitTemplate;

    @Test
    public void test1(){
        // 通过 direct 交换器给 “张三.msg” 队列发送消息

        // send 方法的 message 参数中需要自己定义消息头和消息体
        // rabbitTemplate.send(exchange,routingkey,message);

        rabbitTemplate.convertAndSend("my.direct","zhangsan.msg","你好 张三");
    }

    @Test
    public void test2(){
        // 接收 “张三.msg” 队列的消息
        Object o = rabbitTemplate.receiveAndConvert("张三.msg");
        System.out.println(o.toString());

        /*
        你好 张三
         */
    }

    @Test
    public void test3(){
        // 通过 fanout 交换器给所有队列发送消息

        rabbitTemplate.convertAndSend("my.fanout", "zhangsan.msg", "大家好");
    }

    @Test
    public void test4(){
        // 所有队列接收消息
        Object msg1 = rabbitTemplate.receiveAndConvert("张三.msg");
        System.out.println(msg1.toString());
        Object msg2 = rabbitTemplate.receiveAndConvert("张四.msg");
        System.out.println(msg2.toString());
        Object msg3 = rabbitTemplate.receiveAndConvert("李三.msg");
        System.out.println(msg3.toString());
        Object msg4 = rabbitTemplate.receiveAndConvert("李四.msg");
        System.out.println(msg4.toString());

        /*
        大家好
        大家好
        大家好
        大家好
         */
    }

    @Test
    public void test5(){
        // 通过 topic 交换器给所有“姓张”的队列发送消息
        rabbitTemplate.convertAndSend("my.topic", "zhang.hello", "张先生 你好");
    }

    @Test
    public void test6(){
        // 所有“姓张”的队列接收消息
        Object msg1 = rabbitTemplate.receiveAndConvert("张三.msg");
        Object msg2 = rabbitTemplate.receiveAndConvert("张四.msg");

        System.out.println(msg1);
        System.out.println(msg2);

        /*
        张先生 你好
        张先生 你好
         */
    }
}
在上述的操作中操作的都是字符串,而通过 RabbitTemplate 是可以直接操作对象的,RabbitTemplate 内部的 Converter 会自动帮我们完成对象的序列化与反序列化:
import com.springboot.bean.User;
import org.junit.Test;
import org.junit.runner.RunWith;
import org.springframework.amqp.rabbit.core.RabbitTemplate;
import org.springframework.beans.factory.annotation.Autowired;
import org.springframework.boot.test.context.SpringBootTest;
import org.springframework.test.context.junit4.SpringRunner;

import java.text.ParseException;
import java.text.SimpleDateFormat;

@RunWith(SpringRunner.class)
@SpringBootTest
public class RabbitTemplateTests {

    @Autowired
    private RabbitTemplate rabbitTemplate;

    @Test
    public void test1() throws ParseException {
        // 直接发送一个对象
        User user = new User(1, "张三", new SimpleDateFormat("yyyy-MM-dd").parse("1998-6-5"), "深圳");
        rabbitTemplate.convertAndSend("my.direct","zhangsan.msg",user);

    }

    @Test
    public void test2(){
        Object o = rabbitTemplate.receiveAndConvert("张三.msg");
        System.out.println(o.getClass());
        System.out.println(o);

        /*
        class com.springboot.bean.User
        User{id=1, name='张三', birthday=Fri Jun 05 00:00:00 CST 1998, city='深圳'}
         */

        // 根据输出结果可以看到,获取的消息自动完成了反序列化转换为 java 对象
    }
}
查看 RabbitMQ 服务器中存储的对象,会发现存储的值为 RabbitMQ 以默认消息转换器 org.springframework.amqp.support.converter.SimpleMessageConverter 序列化后的值,如果我们需要存储的消息为 Json 格式,只需要自己注册一个 Json 格式消息转换器到容器即可,而 Spring 已经给我们提供了这个转换器:
// com.springboot.config.MyAmqpConfig
import org.springframework.amqp.rabbit.annotation.EnableRabbit;
import org.springframework.amqp.support.converter.Jackson2JsonMessageConverter;
import org.springframework.amqp.support.converter.MessageConverter;
import org.springframework.context.annotation.Bean;
import org.springframework.context.annotation.Configuration;

@Configuration
@EnableRabbit
public class MyAmqpConfig {
    @Bean
    public MessageConverter messageConverter(){
        Jackson2JsonMessageConverter jackson2JsonMessageConverter = new Jackson2JsonMessageConverter();
        return jackson2JsonMessageConverter;
    }
}
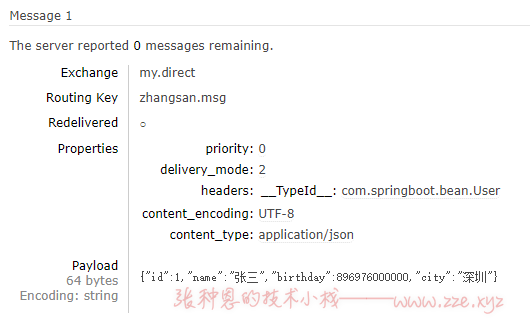
此时再次执行上述操作,查看服务器中存储消息:
监听队列注解
Spring 也为我们提供了监听队列支持的注解 @RabbitListener,它能够帮我们很简便的创建一个监听服务,只需要标注在一个存放在 IoC 容器中实例的方法上。看如下示例:
1、创建一个服务类,注册到 IoC 容器,使用 @RabbitListener 注解标注在方法上:
// com.springboot.service.UserService
import com.springboot.bean.User;
import org.springframework.amqp.core.Message;
import org.springframework.amqp.rabbit.annotation.RabbitListener;
import org.springframework.stereotype.Service;

@Service
public class UserService {

    @RabbitListener(queues = {"张三.msg"})  // 监听指定队列消息
    public void receiveUserMsg(User user) {
        // 接收自动反序列化后的对象
        System.out.println(user);
    }

    @RabbitListener(queues = {"李四.msg"})
    public void receiveMessage(Message message){
        // 接收源消息信息

        // 获得消息体
        System.out.println(message.getBody());
        // 获得消息属性信息
        System.out.println(message.getMessageProperties());
    }
}
2、启动程序,运行单元测试中发送 User 对象方法,监听程序输出如下:
User{id=1, name='张三', birthday=Fri Jun 05 00:00:00 CST 1998, city='深圳'}
AmqpAdmin 组件
Spring 自动注册了一个 AmqpAdmin 组件,它的作用类似于数据库中的 DDL 语句,可以用来帮我们定义(创建)交换器、队列。如下:
import org.junit.Test;
import org.junit.runner.RunWith;
import org.springframework.amqp.core.*;
import org.springframework.beans.factory.annotation.Autowired;
import org.springframework.boot.test.context.SpringBootTest;
import org.springframework.test.context.junit4.SpringRunner;

@RunWith(SpringRunner.class)
@SpringBootTest
public class AmqpAdminTests {

    @Autowired
    private AmqpAdmin amqpAdmin;

    @Test
    public void testDeclareExchange(){
        // 创建一个交换器
        Exchange exchange = new DirectExchange("my.directNew");
        amqpAdmin.declareExchange(exchange);


    }

    @Test
    public void testDeclareQueue(){
        // 创建 Queue
        Queue queue = new Queue("myQueue");
        amqpAdmin.declareQueue(queue);


    }

    @Test
    public void testBinding(){
        // 创建一个 binding ,绑定交换器与队列
        amqpAdmin.declareBinding(new Binding("myQueue", Binding.DestinationType.QUEUE,"my.directNew","myQueue",null));


    }
}
评论区