-de8bd8f33c3e44a59907dafe1884f228.png)


在上一章节完成了一个简单的微服务案例,下面就通过在这个案例的基础上集成 Eureka 来学习 Eureka。
介绍
概述
Eureka 是 Netflix 的一个子模块,也是核心模块之一。Eureka 是一个基于 REST 的服务,用于定位服务,以实现云端中间层服务发现和故障转移。服务注册与发现对于微服务架构来说是非常重要的,有了服务发现与注册,只需要使用服务的标识符,就可以访问到服务。功能类似于 Dubbo 的注册中心,比如 Zookeeper。
SpringCloud 封装了 Netflix 公司开发的 Eureka 模块来实现服务注册与发现,Eureka 采用了 C/S 的设计架构。
Eureka Server 作为服务注册功能的服务器,它是服务注册中心。而系统中的其它微服务,使用 Eureka 的客户端连接到 Eureka Server 并维持心跳连接。这样系统的维护人员就可以通过 Eureka Server 来监控系统中的各个微服务是否正常运行。SpringCloud 的一些其它模块(比如 Zuul)就可以通过 Eureka Server 来发现系统中的其它微服务,并执行相关逻辑。
基本架构
Eureka Server 包含两个组件:
- Eureka Server :提供服务注册的服务,各个节点启动后,会在 Eureka Server 中进行注册,这样 EurekaServer 中的服务注册表中将会存储所有可用服务节点的信息,服务节点的信息可以在界面中直观的看到。
- Eureka Client:是一个 Java 客户端,用于简化 Eureka Server 的交互,客户端同时也具备一个内置的、使用轮询(round-robin)负载算法的负载均衡器。在应用启动后,将会向 Eureka Server 发送心跳(默认周期为 30 秒)。如果 Eureka Server 在多个心跳周期内没有接收到某个节点的心跳,Eureka Server 将会从服务注册表中把这个服务节点一处(默认 90 秒)。
三大角色
- Eureka Server:提供服务注册与发现。
- Service Provider:服务提供方将自身服务注册到 Eureka,从而是服务消费方能够找到。
- Service Consumer:服务消费方从 Eureka 获取到注册服务列表,从而能够获取并消费服务。
结构图
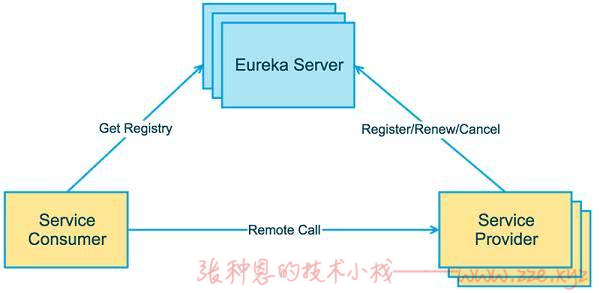
图 1:Eureka 架构图
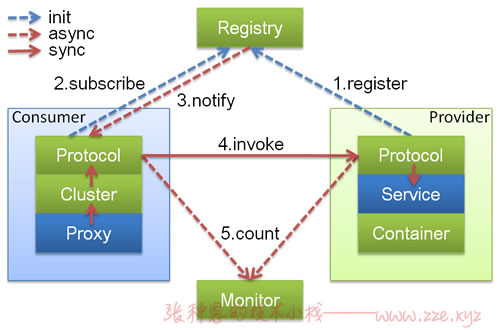
图 2:Dubbo 架构图
使用
EurekaServer 端
1、新建名为 "microservicecloud-eureka-7001" 的子工程作为 Eureka 服务端,依赖如下:
<!-- pom.xml -->
<?xml version="1.0" encoding="UTF-8"?>
<project xmlns="http://maven.apache.org/POM/4.0.0"
         xmlns:xsi="http://www.w3.org/2001/XMLSchema-instance"
         xsi:schemaLocation="http://maven.apache.org/POM/4.0.0 http://maven.apache.org/xsd/maven-4.0.0.xsd">
    <parent>
        <artifactId>microservicecloud</artifactId>
        <groupId>zze.springcloud</groupId>
        <version>1.0-SNAPSHOT</version>
    </parent>
    <modelVersion>4.0.0</modelVersion>

    <artifactId>microservicecloud-eureka-7001</artifactId>

    <dependencies>
        <!--eureka-server服务端 -->
        <dependency>
            <groupId>org.springframework.cloud</groupId>
            <artifactId>spring-cloud-starter-eureka-server</artifactId>
        </dependency>
        <!-- 修改后立即生效,热部署 -->
        <dependency>
            <groupId>org.springframework</groupId>
            <artifactId>springloaded</artifactId>
        </dependency>
        <dependency>
            <groupId>org.springframework.boot</groupId>
            <artifactId>spring-boot-devtools</artifactId>
        </dependency>
    </dependencies>
</project>
2、配置 Eureka :
# application.yml
server:
  port: 7001

eureka:
  instance:
    hostname: localhost # eureka 服务端实例名称

  client:
    register-with-eureka: false # 表示不向注册中心注册自己
    fetch-registry: false # false 表示自己就是注册中心,不需要检索服务
    service-url:
      defaultZone: http://${eureka.instance.hostname}:${server.port}/eureka/ # 设置与 Eureka Server 交互的地址,可用来查询注册的服务
3、编写主启动类,并使用注解开启 Eureka Server 功能:
// zze.springcloud.Application_7001
import org.springframework.boot.SpringApplication;
import org.springframework.boot.autoconfigure.SpringBootApplication;
import org.springframework.cloud.netflix.eureka.server.EnableEurekaServer;

@SpringBootApplication
@EnableEurekaServer // 开启 Eureka Server 功能,标识当前程序就是一个 Eureka Server
public class Application_7001 {

    public static void main(String[] args) {
        SpringApplication.run(Application_7001.class, args);
    }
}
4、测试,运行主启动类,浏览器访问“http://localhost:7001/”进入 Eureka Server 图形化页面:

@EnableDiscoveryClient 和 @EnableEurekaClient:
- 共同点:都是能够让注册中心能够发现,扫描到该服务。
- 不同点:
@EnableEurekaClient只适用于 Eureka 作为注册中心,@EnableDiscoveryClient可以是其他注册中心。 从Spring Cloud Edgware开始,@EnableDiscoveryClient或@EnableEurekaClient可省略。只需加上相关依赖,并进行相应配置,即可将微服务注册到服务发现组件上。
客户端 Provider 注册
1、修改名为 "microservicecloud-provider-dept-8001" 的工程的 pom 文件,添加如下 Eureka 客户端依赖:
<!--pom.xmlEureka 客户端依赖-->
<dependency>
    <groupId>org.springframework.cloud</groupId>
    <artifactId>spring-cloud-starter-eureka</artifactId>
</dependency>
<dependency>
    <groupId>org.springframework.cloud</groupId>
    <artifactId>spring-cloud-starter-config</artifactId>
</dependency>
2、将当前工程作为 Eureka 客户端注册到 Eureka 服务,在配置文件添加如下配置:
# application.yml
eureka:
  client: # 将当前工程作为 Eureka 客户端
    service-url:
      defaultZone: http://localhost:7001/eureka # Eureka 服务端地址
3、在主启动类添加注解标识当前工程为 Eureka 客户端:
// zze.springcloud.Application_8001
import org.springframework.boot.SpringApplication;
import org.springframework.boot.autoconfigure.SpringBootApplication;
import org.springframework.cloud.netflix.eureka.EnableEurekaClient;

@SpringBootApplication
@EnableEurekaClient // 标注当前工程为 Eureka 客户端
public class Application_8001 {
    public static void main(String[] args) {
        SpringApplication.run(Application_8001.class, args);
    }
}
4、测试,先启动 7001 Eureka 服务端工程,再启动 8001 Eureka 客户端工程,浏览器访问“http://localhost:7001/”,可以看到 8001 客户端实例已经被注册到 Eureka 服务端:

服务发现
服务发现实际上就是让 EurekaServer 端能够扫描到我们注册的服务,默认我们可以通过 Web UI 的方式查看哪些服务注册到了 EurekaServer,还可以通过 Eureka 客户端依赖提供的服务发现客户端获取注册到 EurekaServer 的服务信息。
1、修改名为 "microservicecloud-consumer-dept-80" 的服务工程添加如下 Eureka 客户端依赖:
<!--Eureka 客户端依赖-->
<dependency>
    <groupId>org.springframework.cloud</groupId>
    <artifactId>spring-cloud-starter-eureka</artifactId>
</dependency>
<dependency>
    <groupId>org.springframework.cloud</groupId>
    <artifactId>spring-cloud-starter-config</artifactId>
</dependency>
2、在其主启动类上添加注解启用 Eureka 客户端功能:
// zze.springcloud.Application_80
import org.springframework.boot.SpringApplication;
import org.springframework.boot.autoconfigure.SpringBootApplication;
import org.springframework.cloud.netflix.eureka.EnableEurekaClient;

@SpringBootApplication
@EnableEurekaClient
public class Application_80 {

    public static void main(String[] args) {
        SpringApplication.run(Application_80.class, args);
    }
}
3、修改 Controller:
# zze.springcloud.controller.DeptController
import org.springframework.beans.factory.annotation.Autowired;
import org.springframework.cloud.client.ServiceInstance;
import org.springframework.cloud.client.discovery.DiscoveryClient;
import org.springframework.web.bind.annotation.*;
import org.springframework.web.client.RestTemplate;
import zze.springcloud.entities.Dept;

import java.util.HashMap;
import java.util.List;
import java.util.Map;

@RestController
@RequestMapping("/consumer/dept")
public class DeptController {
    @Autowired
    private RestTemplate restTemplate;

    @PostMapping("/add")
    public boolean add(@RequestBody Dept dept) {
        return restTemplate.postForObject(getRestUrlPrefix("MICROSERVICECLOUD-PROVIDER-DEPT") + "/dept/add", dept,Boolean.class);
    }

    @GetMapping("/get/{id}")
    public Dept get(@PathVariable Long id){
        return restTemplate.getForObject(getRestUrlPrefix("MICROSERVICECLOUD-PROVIDER-DEPT") + "/dept/get/" + id, Dept.class);
    }

    @GetMapping("/list")
    public List<Dept> list(){
        return restTemplate.getForObject(getRestUrlPrefix("MICROSERVICECLOUD-PROVIDER-DEPT") + "/dept/list", List.class);
    }

    // 服务发现客户端
    @Autowired
    private DiscoveryClient discoveryClient;

    /**
     * 通过服务名称获取到服务实例对应的 url
     */
    private String getRestUrlPrefix(String serviceName){
        List<String> services = discoveryClient.getServices();
        System.out.println("---------------------------"+services);
        List<ServiceInstance> instances = discoveryClient.getInstances(serviceName);
        System.out.println(instances);
        // 比如只注册了一个 MICROSERVICECLOUD-PROVIDER-DEPT 微服务实例
        ServiceInstance serviceInstance = instances.get(0);
        return String.format("http://%s:%s", serviceInstance.getHost(), serviceInstance.getPort());
    }

    /**
     * 获取所有注册到 EurekaServer 的服务信息
     * @return
     */
    @GetMapping("/discovery")
    public Object discovery(){
        Map<String, Object> map = new HashMap<>();
        // 获取所有注册到 EurekaServer 的微服务名称,对应 spring.application.name
        List<String> services = discoveryClient.getServices();
        for (String service : services) {
            // 获取对应服务所有实例
            List<ServiceInstance> instances = discoveryClient.getInstances(service);
            map.put(service, instances);
        }
        return map;
    }

}
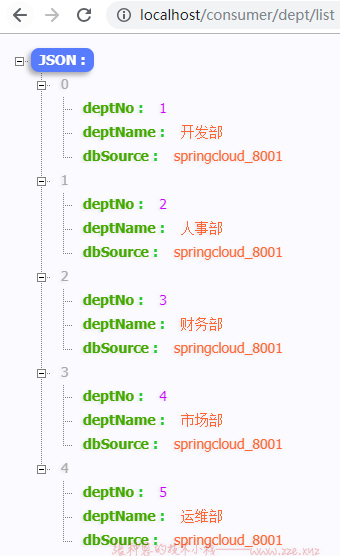
4、测试,正常访问“http://localhost/consumer/dept/list”:
5、访问“http://localhost/consumer/dept/discovery”查看所有服务信息:
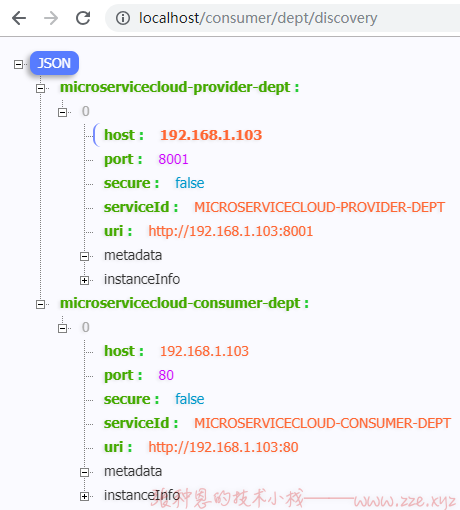
即通过服务发现我们只需要使用约定的服务名称就可以通过注册中心访问到具体服务信息。
评论区