-de8bd8f33c3e44a59907dafe1884f228.png)


环境准备
机器
由于我这里机器资源有限,准备如下配置的三台虚拟机:
如上每台虚拟机都有如下配置:
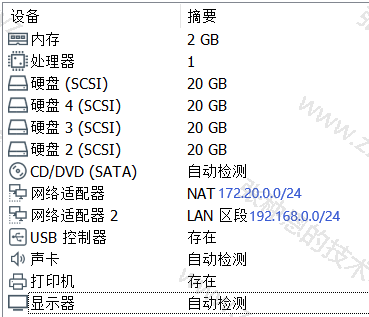
- 一块 20G 的系统盘和 3 块 20G 的数据盘;
- 两个网卡,
172.20.0.0/24段用于外部访问,192.168.0.0/24用于虚拟机局域网内通信; - 内存 2G;
- 1 个 1 核 CPU;
- 系统为 Ubuntu 18.04;
各机器 IP 规划如下:
| 主机名 | eth0 IP | eth1 IP | 角色 |
|---|---|---|---|
| ceph-node1 | 172.20.0.21 | 192.168.0.21 | ceph-node、ceph-deploy、ceph-mon、ceph-mgr |
| ceph-node2 | 172.20.0.22 | 192.168.0.22 | ceph-node、ceph-mon、ceph-mgr |
| ceph-node3 | 172.20.0.23 | 192.168.0.23 | ceph-node、ceph-mon、ceph-mgr |
由于我这里机器资源有限,我就仅用三台机器部署 Ceph 集群所需的所有角色,其实每个角色都可以单独使用一个机器。
软件环境
下面操作若未做特别标注则需要在所有机器执行。
添加 Ceph 源
Ubuntu 添加 apt 源
1、从清华大学镜像源添加 Ceph 源:
$ wget -q -O- 'https://download.ceph.com/keys/release.asc' | sudo apt-key add -
$ sudo apt-add-repository 'deb https://mirrors.tuna.tsinghua.edu.cn/ceph/debian-pacific/ bionic main'
$ sudo apt update
debian-pacific 是目前(2021.9.13)的最新版,参见 https://docs.ceph.com/en/latest/releases/index.html。
CentOS 添加 yum 源
目前(2021.11.18)最新版的 Ceph(pacific)只提供了 Ubuntu 上的 deb 包,而 CentOS 最新只有 octopus 版本的 rpm 包,添加 octopus 版本的 Ceph yum 源操作如下:
$ cat << EOF > /etc/yum.repos.d/ceph.repo
[ceph]
name=Ceph packages for
baseurl=https://mirrors.tuna.tsinghua.edu.cn/ceph/rpm-octopus/el7/x86_64
enabled=1
priority=2
gpgcheck=1
gpgkey=https://mirrors.tuna.tsinghua.edu.cn/ceph/keys/release.asc

[ceph-noarch]
name=Ceph noarch packages
baseurl=https://mirrors.tuna.tsinghua.edu.cn/ceph/rpm-octopus/el7/noarch
enabled=1
priority=2
gpgcheck=1
gpgkey=https://mirrors.tuna.tsinghua.edu.cn/ceph/keys/release.asc

[ceph-source]
name=Ceph source packages
baseurl=https://mirrors.tuna.tsinghua.edu.cn/ceph/rpm-octopus/el7/SRPMS
enabled=0
priority=2
gpgcheck=1
gpgkey=https://mirrors.tuna.tsinghua.edu.cn/ceph/keys/release.asc
EOF
创建管理用户
推荐使用指定的普通用户部署和运行 Ceph 集群,普通用户只要能以非交互方式执行 sudo 命令执行一些特权命令即可,推荐使用如 ceph、cephuser、cephadmin 这样的用户去管理 Ceph 集群。注意:不要使用名为 ceph 的用户。
在包含 ceph-deploy 节点的存储节点、mon 节点和 mgr 节点等创建 cephadmin 用户。
ceph-deploy只用于部署和管理 Ceph 集群,客户端如果需要访问 Ceph,需要部署客户端工具(apt install ceph-common -y)。
$ groupadd -r -g 2022 cephadmin && useradd -r -m -s /bin/bash -u 2022 -g 2022 cephadmin && echo cephadmin:ceph1234 | chpasswd
允许 cephadmin 用户已 sudo 执行特权命令:
$ vim /etc/sudoers
# 添加一行
cephadmin    ALL=(ALL:ALL) NOPASSWD:ALL
配置三台机器可以以 cephadmin 用户互相免密访问:
# 此操作在 ceph-node1 执行
$ sudo su - cephadmin
$ ssh-keygen
$ mv /home/cephadmin/.ssh/id_rsa.pub /home/cephadmin/.ssh/authorized_keys
$ chmod 600 /home/cephadmin/.ssh/authorized_keys
# 同步私钥和公钥到 ceph-node2 和 cpeh-node3
$ scp -rp /home/cephadmin/.ssh 192.168.0.22:/home/cephadmin/
$ scp -rp /home/cephadmin/.ssh 192.168.0.23:/home/cephadmin/
修改 hosts
为每个主机添加如下几行 hosts 解析:
$ vim /etc/hosts
192.168.0.21 ceph-node1.zze.xyz ceph-node1
192.168.0.22 ceph-node2.zze.xyz ceph-node2
192.168.0.23 ceph-node3.zze.xyz ceph-node3
安装 ceph-deploy
下面操作在一台主机执行即可,我这里选定在
ceph-node1执行。
$ apt-cache madison ceph-deploy
ceph-deploy |      2.0.1 | https://mirrors.tuna.tsinghua.edu.cn/ceph/debian-pacific bionic/main amd64 Packages
ceph-deploy | 1.5.38-0ubuntu1 | http://mirrors.aliyun.com/ubuntu bionic/universe amd64 Packages
ceph-deploy | 1.5.38-0ubuntu1 | http://mirrors.aliyun.com/ubuntu bionic/universe Sources
$ apt install ceph-deploy -y
ceph-deploy 帮助说明:
$ ceph-deploy --help
usage: ceph-deploy [-h] [-v | -q] [--version] [--username USERNAME]
                   [--overwrite-conf] [--ceph-conf CEPH_CONF]
                   COMMAND ...

Easy Ceph deployment

    -^-
   /   \
   |O o|  ceph-deploy v2.0.1
   ).-.(
  '/|||\`
  | '|` |
    '|`

Full documentation can be found at: http://ceph.com/ceph-deploy/docs

optional arguments:
  -h, --help            show this help message and exit
  -v, --verbose         be more verbose
  -q, --quiet           be less verbose
  --version             the current installed version of ceph-deploy
  --username USERNAME   the username to connect to the remote host
  --overwrite-conf      overwrite an existing conf file on remote host (if
                        present)
  --ceph-conf CEPH_CONF
                        use (or reuse) a given ceph.conf file

commands:
  COMMAND               description
    new                 开始部署一个新的 ceph 集群,并生成 CLUSTER.conf 集群配置文件和 keyring 认证文件。
    install             在远程主机安装 ceph 相关软件包,可通过 --release 指定安装的版本
    rgw                 管理 RGW 守护程序(RADOSGW,对象存储网关)
    mgr                 管理 MGR 守护程序(ceph-mgr,Ceph Manager Deamon,Ceph 管理器守护程序)
    mon                 管理 MON 守护程序(ceph-mon,Ceph 监视器)
    mds                 管理 MDS 守护程序(Ceph Metadata Server,Ceph 元数据服务器)
    gatherkeys          获取提供新节点的验证 keys,这些 keys 会在添加的 MON、OSD、MDS 加入的时候使用
    disk                管理远程主机磁盘
    osd                 在远程主机准备数据磁盘,即将指定远程主机的指定磁盘添加到 Ceph 集群作为 OSD 使用
    admin               将 Ceph 集群配置文件推送到远程主机或从远程主机拷贝
    repo                远程主机仓库管理
    config              将 ceph.conf 配置文件推送到远程主机或从远程主机拷贝
    uninstall           从远程主机删除 Ceph 相关安装包
    purge               删除远程主机的安装包和所有数据
    purgedata           从 /var/lib/ceph 删除 Ceph 数据,并删除 /etc/ceph 下的内容
    calamari            安装并配置一个 Calamari 节点,Calamari 是一个 Web 监控平台
    forgetkeys          从本地主机删除所有的验证 keyring,包括 client.admin、monitor、bootstrap 等认证文件
    pkg                 管理远程主机上的软件包

See 'ceph-deploy <command> --help' for help on a specific command
开始部署
在装有 ceph-deploy 的主机(ceph-node1)以 cephadmin 用户身份创建初始化目录:
$ sudo su - cephadmin
$ mkdir ceph-cluster && cd ceph-cluster
初始化 mon 节点
在每个 mon 节点安装所需软件包并创建软链接:
# 在 root 用户下执行
$ apt install python2.7 ceph-mon -y
$ ln -sv /usr/bin/python2.7 /usr/bin/python2
安装过程中会弹出交互式对话框,按两次回车选定默认配置就行。
在 ceph-node1 执行初始化操作生成配置:
cephadmin@ceph-node1:~/ceph-cluster$ ceph-deploy new --cluster-network 192.168.0.0/24 --public-network 172.20.0.0/24 ceph-node1 --no-ssh-copykey
[ceph_deploy.conf][DEBUG ] found configuration file at: /home/cephadmin/.cephdeploy.conf
[ceph_deploy.cli][INFO  ] Invoked (2.0.1): /usr/bin/ceph-deploy new --cluster-network 192.168.0.0/24 --public-network 172.20.0.0/24 ceph-node1
[ceph_deploy.cli][INFO  ] ceph-deploy options:
[ceph_deploy.cli][INFO  ]  username                      : None
[ceph_deploy.cli][INFO  ]  verbose                       : False
[ceph_deploy.cli][INFO  ]  overwrite_conf                : False
[ceph_deploy.cli][INFO  ]  quiet                         : False
[ceph_deploy.cli][INFO  ]  cd_conf                       : <ceph_deploy.conf.cephdeploy.Conf instance at 0x7f35f5c17e10>
[ceph_deploy.cli][INFO  ]  cluster                       : ceph
[ceph_deploy.cli][INFO  ]  ssh_copykey                   : True
[ceph_deploy.cli][INFO  ]  mon                           : ['ceph-node1']
[ceph_deploy.cli][INFO  ]  func                          : <function new at 0x7f35f3016ad0>
[ceph_deploy.cli][INFO  ]  public_network                : 172.20.0.0/24
[ceph_deploy.cli][INFO  ]  ceph_conf                     : None
[ceph_deploy.cli][INFO  ]  cluster_network               : 192.168.0.0/24
[ceph_deploy.cli][INFO  ]  default_release               : False
[ceph_deploy.cli][INFO  ]  fsid                          : None
[ceph_deploy.new][DEBUG ] Creating new cluster named ceph
[ceph_deploy.new][INFO  ] making sure passwordless SSH succeeds
[ceph-node1][DEBUG ] connection detected need for sudo
[ceph-node1][DEBUG ] connected to host: ceph-node1
[ceph-node1][DEBUG ] detect platform information from remote host
[ceph-node1][DEBUG ] detect machine type
[ceph-node1][DEBUG ] find the location of an executable
[ceph-node1][INFO  ] Running command: sudo /bin/ip link show
[ceph-node1][INFO  ] Running command: sudo /bin/ip addr show
[ceph-node1][DEBUG ] IP addresses found: [u'172.20.0.21', u'192.168.0.21']
[ceph_deploy.new][DEBUG ] Resolving host ceph-node1
[ceph_deploy.new][DEBUG ] Monitor ceph-node1 at 172.20.0.21
[ceph_deploy.new][DEBUG ] Monitor initial members are ['ceph-node1']
[ceph_deploy.new][DEBUG ] Monitor addrs are [u'172.20.0.21']
[ceph_deploy.new][DEBUG ] Creating a random mon key...
[ceph_deploy.new][DEBUG ] Writing monitor keyring to ceph.mon.keyring...
[ceph_deploy.new][DEBUG ] Writing initial config to ceph.conf...

cephadmin@ceph-node1:~/ceph-cluster$ ls
ceph.conf  ceph-deploy-ceph.log  ceph.mon.keyring

cephadmin@ceph-node1:~/ceph-cluster$ cat ceph.conf
[global]
fsid = 2a71ed03-5918-4126-a2ec-8fd8ac173627
public_network = 172.20.0.0/24
cluster_network = 192.168.0.0/24
mon_initial_members = ceph-node1
mon_host = 172.20.0.21
auth_cluster_required = cephx
auth_service_required = cephx
auth_client_required = cephx

cephadmin@ceph-node1:~/ceph-cluster$ cat ceph.mon.keyring
[mon.]
key = AQA2dEBhAAAAABAAtKaruK+1xeSS9BqkKXEglQ==
caps mon = allow *
初始化 mon 节点:
# 这一步会读取 ceph.conf 配置内容,即初始化 172.20.0.21 作为 mon 节点
cephadmin@ceph-node1:~/ceph-cluster$ ceph-deploy mon create-initial
[ceph_deploy.conf][DEBUG ] found configuration file at: /home/cephadmin/.cephdeploy.conf
[ceph_deploy.cli][INFO  ] Invoked (2.0.1): /usr/bin/ceph-deploy mon create-initial
[ceph_deploy.cli][INFO  ] ceph-deploy options:
[ceph_deploy.cli][INFO  ]  username                      : None
[ceph_deploy.cli][INFO  ]  verbose                       : False
[ceph_deploy.cli][INFO  ]  overwrite_conf                : False
[ceph_deploy.cli][INFO  ]  subcommand                    : create-initial
[ceph_deploy.cli][INFO  ]  quiet                         : False
[ceph_deploy.cli][INFO  ]  cd_conf                       : <ceph_deploy.conf.cephdeploy.Conf instance at 0x7f659832cfa0>
[ceph_deploy.cli][INFO  ]  cluster                       : ceph
[ceph_deploy.cli][INFO  ]  func                          : <function mon at 0x7f6598310ad0>
[ceph_deploy.cli][INFO  ]  ceph_conf                     : None
[ceph_deploy.cli][INFO  ]  keyrings                      : None
[ceph_deploy.cli][INFO  ]  default_release               : False
[ceph_deploy.mon][DEBUG ] Deploying mon, cluster ceph hosts ceph-node1
[ceph_deploy.mon][DEBUG ] detecting platform for host ceph-node1 ...
[ceph-node1][DEBUG ] connection detected need for sudo
[ceph-node1][DEBUG ] connected to host: ceph-node1
[ceph-node1][DEBUG ] detect platform information from remote host
[ceph-node1][DEBUG ] detect machine type
[ceph-node1][DEBUG ] find the location of an executable
[ceph_deploy.mon][INFO  ] distro info: Ubuntu 18.04 bionic
[ceph-node1][DEBUG ] determining if provided host has same hostname in remote
[ceph-node1][DEBUG ] get remote short hostname
[ceph-node1][DEBUG ] deploying mon to ceph-node1
[ceph-node1][DEBUG ] get remote short hostname
[ceph-node1][DEBUG ] remote hostname: ceph-node1
[ceph-node1][DEBUG ] write cluster configuration to /etc/ceph/{cluster}.conf
[ceph-node1][DEBUG ] create the mon path if it does not exist
[ceph-node1][DEBUG ] checking for done path: /var/lib/ceph/mon/ceph-ceph-node1/done
[ceph-node1][DEBUG ] done path does not exist: /var/lib/ceph/mon/ceph-ceph-node1/done
[ceph-node1][INFO  ] creating keyring file: /var/lib/ceph/tmp/ceph-ceph-node1.mon.keyring
[ceph-node1][DEBUG ] create the monitor keyring file
[ceph-node1][INFO  ] Running command: sudo ceph-mon --cluster ceph --mkfs -i ceph-node1 --keyring /var/lib/ceph/tmp/ceph-ceph-node1.mon.keyring --setuser 64045 --setgroup 64045
[ceph-node1][INFO  ] unlinking keyring file /var/lib/ceph/tmp/ceph-ceph-node1.mon.keyring
[ceph-node1][DEBUG ] create a done file to avoid re-doing the mon deployment
[ceph-node1][DEBUG ] create the init path if it does not exist
[ceph-node1][INFO  ] Running command: sudo systemctl enable ceph.target
[ceph-node1][INFO  ] Running command: sudo systemctl enable ceph-mon@ceph-node1
[ceph-node1][WARNIN] Created symlink /etc/systemd/system/ceph-mon.target.wants/ceph-mon@ceph-node1.service → /lib/systemd/system/ceph-mon@.service.
[ceph-node1][INFO  ] Running command: sudo systemctl start ceph-mon@ceph-node1
[ceph-node1][INFO  ] Running command: sudo ceph --cluster=ceph --admin-daemon /var/run/ceph/ceph-mon.ceph-node1.asok mon_status
[ceph-node1][DEBUG ] ********************************************************************************
[ceph-node1][DEBUG ] status for monitor: mon.ceph-node1
[ceph-node1][DEBUG ] {
[ceph-node1][DEBUG ]   "election_epoch": 3,
[ceph-node1][DEBUG ]   "extra_probe_peers": [],
[ceph-node1][DEBUG ]   "feature_map": {
[ceph-node1][DEBUG ]     "mon": [
[ceph-node1][DEBUG ]       {
[ceph-node1][DEBUG ]         "features": "0x3f01cfb9fffdffff",
[ceph-node1][DEBUG ]         "num": 1,
[ceph-node1][DEBUG ]         "release": "luminous"
[ceph-node1][DEBUG ]       }
[ceph-node1][DEBUG ]     ]
[ceph-node1][DEBUG ]   },
[ceph-node1][DEBUG ]   "features": {
[ceph-node1][DEBUG ]     "quorum_con": "4540138297136906239",
[ceph-node1][DEBUG ]     "quorum_mon": [
[ceph-node1][DEBUG ]       "kraken",
[ceph-node1][DEBUG ]       "luminous",
[ceph-node1][DEBUG ]       "mimic",
[ceph-node1][DEBUG ]       "osdmap-prune",
[ceph-node1][DEBUG ]       "nautilus",
[ceph-node1][DEBUG ]       "octopus",
[ceph-node1][DEBUG ]       "pacific",
[ceph-node1][DEBUG ]       "elector-pinging"
[ceph-node1][DEBUG ]     ],
[ceph-node1][DEBUG ]     "required_con": "2449958747317026820",
[ceph-node1][DEBUG ]     "required_mon": [
[ceph-node1][DEBUG ]       "kraken",
[ceph-node1][DEBUG ]       "luminous",
[ceph-node1][DEBUG ]       "mimic",
[ceph-node1][DEBUG ]       "osdmap-prune",
[ceph-node1][DEBUG ]       "nautilus",
[ceph-node1][DEBUG ]       "octopus",
[ceph-node1][DEBUG ]       "pacific",
[ceph-node1][DEBUG ]       "elector-pinging"
[ceph-node1][DEBUG ]     ]
[ceph-node1][DEBUG ]   },
[ceph-node1][DEBUG ]   "monmap": {
[ceph-node1][DEBUG ]     "created": "2021-09-14T10:07:58.734879Z",
[ceph-node1][DEBUG ]     "disallowed_leaders: ": "",
[ceph-node1][DEBUG ]     "election_strategy": 1,
[ceph-node1][DEBUG ]     "epoch": 1,
[ceph-node1][DEBUG ]     "features": {
[ceph-node1][DEBUG ]       "optional": [],
[ceph-node1][DEBUG ]       "persistent": [
[ceph-node1][DEBUG ]         "kraken",
[ceph-node1][DEBUG ]         "luminous",
[ceph-node1][DEBUG ]         "mimic",
[ceph-node1][DEBUG ]         "osdmap-prune",
[ceph-node1][DEBUG ]         "nautilus",
[ceph-node1][DEBUG ]         "octopus",
[ceph-node1][DEBUG ]         "pacific",
[ceph-node1][DEBUG ]         "elector-pinging"
[ceph-node1][DEBUG ]       ]
[ceph-node1][DEBUG ]     },
[ceph-node1][DEBUG ]     "fsid": "2a71ed03-5918-4126-a2ec-8fd8ac173627",
[ceph-node1][DEBUG ]     "min_mon_release": 16,
[ceph-node1][DEBUG ]     "min_mon_release_name": "pacific",
[ceph-node1][DEBUG ]     "modified": "2021-09-14T10:07:58.734879Z",
[ceph-node1][DEBUG ]     "mons": [
[ceph-node1][DEBUG ]       {
[ceph-node1][DEBUG ]         "addr": "172.20.0.21:6789/0",
[ceph-node1][DEBUG ]         "crush_location": "{}",
[ceph-node1][DEBUG ]         "name": "ceph-node1",
[ceph-node1][DEBUG ]         "priority": 0,
[ceph-node1][DEBUG ]         "public_addr": "172.20.0.21:6789/0",
[ceph-node1][DEBUG ]         "public_addrs": {
[ceph-node1][DEBUG ]           "addrvec": [
[ceph-node1][DEBUG ]             {
[ceph-node1][DEBUG ]               "addr": "172.20.0.21:3300",
[ceph-node1][DEBUG ]               "nonce": 0,
[ceph-node1][DEBUG ]               "type": "v2"
[ceph-node1][DEBUG ]             },
[ceph-node1][DEBUG ]             {
[ceph-node1][DEBUG ]               "addr": "172.20.0.21:6789",
[ceph-node1][DEBUG ]               "nonce": 0,
[ceph-node1][DEBUG ]               "type": "v1"
[ceph-node1][DEBUG ]             }
[ceph-node1][DEBUG ]           ]
[ceph-node1][DEBUG ]         },
[ceph-node1][DEBUG ]         "rank": 0,
[ceph-node1][DEBUG ]         "weight": 0
[ceph-node1][DEBUG ]       }
[ceph-node1][DEBUG ]     ],
[ceph-node1][DEBUG ]     "stretch_mode": false
[ceph-node1][DEBUG ]   },
[ceph-node1][DEBUG ]   "name": "ceph-node1",
[ceph-node1][DEBUG ]   "outside_quorum": [],
[ceph-node1][DEBUG ]   "quorum": [
[ceph-node1][DEBUG ]     0
[ceph-node1][DEBUG ]   ],
[ceph-node1][DEBUG ]   "quorum_age": 1,
[ceph-node1][DEBUG ]   "rank": 0,
[ceph-node1][DEBUG ]   "state": "leader",
[ceph-node1][DEBUG ]   "stretch_mode": false,
[ceph-node1][DEBUG ]   "sync_provider": []
[ceph-node1][DEBUG ] }
[ceph-node1][DEBUG ] ********************************************************************************
[ceph-node1][INFO  ] monitor: mon.ceph-node1 is running
[ceph-node1][INFO  ] Running command: sudo ceph --cluster=ceph --admin-daemon /var/run/ceph/ceph-mon.ceph-node1.asok mon_status
[ceph_deploy.mon][INFO  ] processing monitor mon.ceph-node1
[ceph-node1][DEBUG ] connection detected need for sudo
[ceph-node1][DEBUG ] connected to host: ceph-node1
[ceph-node1][DEBUG ] detect platform information from remote host
[ceph-node1][DEBUG ] detect machine type
[ceph-node1][DEBUG ] find the location of an executable
[ceph-node1][INFO  ] Running command: sudo ceph --cluster=ceph --admin-daemon /var/run/ceph/ceph-mon.ceph-node1.asok mon_status
[ceph_deploy.mon][INFO  ] mon.ceph-node1 monitor has reached quorum!
[ceph_deploy.mon][INFO  ] all initial monitors are running and have formed quorum
[ceph_deploy.mon][INFO  ] Running gatherkeys...
[ceph_deploy.gatherkeys][INFO  ] Storing keys in temp directory /tmp/tmpYQHBdE
[ceph-node1][DEBUG ] connection detected need for sudo
[ceph-node1][DEBUG ] connected to host: ceph-node1
[ceph-node1][DEBUG ] detect platform information from remote host
[ceph-node1][DEBUG ] detect machine type
[ceph-node1][DEBUG ] get remote short hostname
[ceph-node1][DEBUG ] fetch remote file
[ceph-node1][INFO  ] Running command: sudo /usr/bin/ceph --connect-timeout=25 --cluster=ceph --admin-daemon=/var/run/ceph/ceph-mon.ceph-node1.asok mon_status
[ceph-node1][INFO  ] Running command: sudo /usr/bin/ceph --connect-timeout=25 --cluster=ceph --name mon. --keyring=/var/lib/ceph/mon/ceph-ceph-node1/keyring auth get client.admin
[ceph-node1][INFO  ] Running command: sudo /usr/bin/ceph --connect-timeout=25 --cluster=ceph --name mon. --keyring=/var/lib/ceph/mon/ceph-ceph-node1/keyring auth get client.bootstrap-mds
[ceph-node1][INFO  ] Running command: sudo /usr/bin/ceph --connect-timeout=25 --cluster=ceph --name mon. --keyring=/var/lib/ceph/mon/ceph-ceph-node1/keyring auth get client.bootstrap-mgr
[ceph-node1][INFO  ] Running command: sudo /usr/bin/ceph --connect-timeout=25 --cluster=ceph --name mon. --keyring=/var/lib/ceph/mon/ceph-ceph-node1/keyring auth get client.bootstrap-osd
[ceph-node1][INFO  ] Running command: sudo /usr/bin/ceph --connect-timeout=25 --cluster=ceph --name mon. --keyring=/var/lib/ceph/mon/ceph-ceph-node1/keyring auth get client.bootstrap-rgw
[ceph_deploy.gatherkeys][INFO  ] Storing ceph.client.admin.keyring
[ceph_deploy.gatherkeys][INFO  ] Storing ceph.bootstrap-mds.keyring
[ceph_deploy.gatherkeys][INFO  ] Storing ceph.bootstrap-mgr.keyring
[ceph_deploy.gatherkeys][INFO  ] keyring 'ceph.mon.keyring' already exists
[ceph_deploy.gatherkeys][INFO  ] Storing ceph.bootstrap-osd.keyring
[ceph_deploy.gatherkeys][INFO  ] Storing ceph.bootstrap-rgw.keyring
[ceph_deploy.gatherkeys][INFO  ] Destroy temp directory /tmp/tmpYQHBdE
此时配置目录下文件如下:
cephadmin@ceph-node1:~/ceph-cluster$ ls
ceph.bootstrap-mds.keyring  ceph.bootstrap-mgr.keyring  ceph.bootstrap-osd.keyring  ceph.bootstrap-rgw.keyring  ceph.client.admin.keyring  ceph.conf  ceph-deploy-ceph.log  ceph.mon.keyring
上述初始化目录生成了一些
ceph.bootstrap-mds/mgr/osd/rgw.keyring文件,它们是对应服务的keyring认证文件,这些初始化文件拥有对 Ceph 集群的最高权限,所以一定要保存好。
验证在 mon 节点已经自动安装并启动了 ceph-mon 服务:
cephadmin@ceph-node1:~/ceph-cluster$ ps aux | grep ceph-mon | grep 'grep' -v
ceph       8416  0.0  2.0 480388 40912 ?        Ssl  10:07   0:00 /usr/bin/ceph-mon -f --cluster ceph --id ceph-node1 --setuser ceph --setgroup ceph
分发 admin 秘钥
在 ceph-deploy 节点把配置文件和 admin 密钥拷贝至 Ceph 集群需要执行 ceph 管理命令的节点,从而后期通过 ceph 命令对 Ceph 集群进行管理配置的时候不需要每次都指定 ceph-mon 节点地址和 ceph.client.admin.keyring 文件,另外各 ceph-mon 节点也需要同步 Ceph 的集群配置文件与认证文件。
如果要在 ceph-deploy 节点管理集群,需要将 admin 密钥推送到 ceph-deploy 节点,我这里把 ceph-node1 当作 ceph-deploy 节点,所以推送给 ceph-node1 即可:
cephadmin@ceph-node1:~/ceph-cluster$ ceph-deploy admin ceph-node1
[ceph_deploy.conf][DEBUG ] found configuration file at: /home/cephadmin/.cephdeploy.conf
[ceph_deploy.cli][INFO  ] Invoked (2.0.1): /usr/bin/ceph-deploy admin ceph-node1
[ceph_deploy.cli][INFO  ] ceph-deploy options:
[ceph_deploy.cli][INFO  ]  username                      : None
[ceph_deploy.cli][INFO  ]  verbose                       : False
[ceph_deploy.cli][INFO  ]  overwrite_conf                : False
[ceph_deploy.cli][INFO  ]  quiet                         : False
[ceph_deploy.cli][INFO  ]  cd_conf                       : <ceph_deploy.conf.cephdeploy.Conf instance at 0x7f04207f2190>
[ceph_deploy.cli][INFO  ]  cluster                       : ceph
[ceph_deploy.cli][INFO  ]  client                        : ['ceph-node1']
[ceph_deploy.cli][INFO  ]  func                          : <function admin at 0x7f04210f3a50>
[ceph_deploy.cli][INFO  ]  ceph_conf                     : None
[ceph_deploy.cli][INFO  ]  default_release               : False
[ceph_deploy.admin][DEBUG ] Pushing admin keys and conf to ceph-node1
[ceph-node1][DEBUG ] connection detected need for sudo
[ceph-node1][DEBUG ] connected to host: ceph-node1
[ceph-node1][DEBUG ] detect platform information from remote host
[ceph-node1][DEBUG ] detect machine type
[ceph-node1][DEBUG ] write cluster configuration to /etc/ceph/{cluster}.conf
也可以同时推送到多个主机:
cephadmin@ceph-node1:~/ceph-cluster$ ceph-deploy admin ceph-node2 ceph-node3
[ceph_deploy.conf][DEBUG ] found configuration file at: /home/cephadmin/.cephdeploy.conf
[ceph_deploy.cli][INFO  ] Invoked (2.0.1): /usr/bin/ceph-deploy admin ceph-node2 ceph-node3
[ceph_deploy.cli][INFO  ] ceph-deploy options:
[ceph_deploy.cli][INFO  ]  username                      : None
[ceph_deploy.cli][INFO  ]  verbose                       : False
[ceph_deploy.cli][INFO  ]  overwrite_conf                : False
[ceph_deploy.cli][INFO  ]  quiet                         : False
[ceph_deploy.cli][INFO  ]  cd_conf                       : <ceph_deploy.conf.cephdeploy.Conf instance at 0x7fdfbc63b190>
[ceph_deploy.cli][INFO  ]  cluster                       : ceph
[ceph_deploy.cli][INFO  ]  client                        : ['ceph-node2', 'ceph-node3']
[ceph_deploy.cli][INFO  ]  func                          : <function admin at 0x7fdfbcf3ca50>
[ceph_deploy.cli][INFO  ]  ceph_conf                     : None
[ceph_deploy.cli][INFO  ]  default_release               : False
[ceph_deploy.admin][DEBUG ] Pushing admin keys and conf to ceph-node2
The authenticity of host 'ceph-node2 (192.168.0.22)' can't be established.
ECDSA key fingerprint is SHA256:aVTm0jYNgywIxlbEm3Z8UDBywTRKL6TsjhLRTHbGbz0.
Are you sure you want to continue connecting (yes/no)? yes
Warning: Permanently added 'ceph-node2' (ECDSA) to the list of known hosts.
[ceph-node2][DEBUG ] connection detected need for sudo
[ceph-node2][DEBUG ] connected to host: ceph-node2
[ceph-node2][DEBUG ] detect platform information from remote host
[ceph-node2][DEBUG ] detect machine type
[ceph-node2][DEBUG ] write cluster configuration to /etc/ceph/{cluster}.conf
[ceph_deploy.admin][DEBUG ] Pushing admin keys and conf to ceph-node3
The authenticity of host 'ceph-node3 (192.168.0.23)' can't be established.
ECDSA key fingerprint is SHA256:aVTm0jYNgywIxlbEm3Z8UDBywTRKL6TsjhLRTHbGbz0.
Are you sure you want to continue connecting (yes/no)? yes
Warning: Permanently added 'ceph-node3' (ECDSA) to the list of known hosts.
[ceph-node3][DEBUG ] connection detected need for sudo
[ceph-node3][DEBUG ] connected to host: ceph-node3
[ceph-node3][DEBUG ] detect platform information from remote host
[ceph-node3][DEBUG ] detect machine type
[ceph-node3][DEBUG ] write cluster configuration to /etc/ceph/{cluster}.conf
被推送的几个主机的 /etc/ceph 下会有如下几个文件:
$ ls -l /etc/ceph/
total 12
-rw------- 1 root root 151 Sep 14 10:37 ceph.client.admin.keyring
-rw-r--r-- 1 root root 263 Sep 14 10:37 ceph.conf
-rw-r--r-- 1 root root  92 Jul  8 14:17 rbdmap
-rw------- 1 root root   0 Sep 14 10:07 tmpGXJLkD
可以看到这几个文件的属主和属组都是 root,如果我们需要通过 cephadmin 用户管理还需要设置一下权限:
# sudo setfacl -m u:cephadmin:rw /etc/ceph/ceph.client.admin.keyring
$ sudo chown -R cephadmin.cephadmin /etc/ceph
然后在这几个节点就可以通过 ceph 命令来查看 Ceph 集群状态:
$ ceph -s
  cluster:
    id:     2a71ed03-5918-4126-a2ec-8fd8ac173627
    health: HEALTH_WARN
            mon is allowing insecure global_id reclaim

  services:
    mon: 1 daemons, quorum ceph-node1 (age 37m)
    mgr: no daemons active
    osd: 0 osds: 0 up, 0 in

  data:
    pools:   0 pools, 0 pgs
    objects: 0 objects, 0 B
    usage:   0 B used, 0 B / 0 B avail
    pgs:
可以看到 services 节下有一个 mon 的守护进程。
初始化 mgr 节点
这里先把 ceph-node1 当做 ceph-mgr 节点,在 ceph-node1 安装 ceph-mgr 软件包:
# 以 root 身份执行
$ apt install ceph-mgr -y
初始化 ceph-node1 为 mgr 节点:
cephadmin@ceph-node1:~/ceph-cluster$ ceph-deploy mgr create ceph-node1
[ceph_deploy.conf][DEBUG ] found configuration file at: /home/cephadmin/.cephdeploy.conf
[ceph_deploy.cli][INFO  ] Invoked (2.0.1): /usr/bin/ceph-deploy mgr create ceph-node1
[ceph_deploy.cli][INFO  ] ceph-deploy options:
[ceph_deploy.cli][INFO  ]  username                      : None
[ceph_deploy.cli][INFO  ]  verbose                       : False
[ceph_deploy.cli][INFO  ]  mgr                           : [('ceph-node1', 'ceph-node1')]
[ceph_deploy.cli][INFO  ]  overwrite_conf                : False
[ceph_deploy.cli][INFO  ]  subcommand                    : create
[ceph_deploy.cli][INFO  ]  quiet                         : False
[ceph_deploy.cli][INFO  ]  cd_conf                       : <ceph_deploy.conf.cephdeploy.Conf instance at 0x7f33ab14ffa0>
[ceph_deploy.cli][INFO  ]  cluster                       : ceph
[ceph_deploy.cli][INFO  ]  func                          : <function mgr at 0x7f33ab5b2150>
[ceph_deploy.cli][INFO  ]  ceph_conf                     : None
[ceph_deploy.cli][INFO  ]  default_release               : False
[ceph_deploy.mgr][DEBUG ] Deploying mgr, cluster ceph hosts ceph-node1:ceph-node1
[ceph-node1][DEBUG ] connection detected need for sudo
[ceph-node1][DEBUG ] connected to host: ceph-node1
[ceph-node1][DEBUG ] detect platform information from remote host
[ceph-node1][DEBUG ] detect machine type
[ceph_deploy.mgr][INFO  ] Distro info: Ubuntu 18.04 bionic
[ceph_deploy.mgr][DEBUG ] remote host will use systemd
[ceph_deploy.mgr][DEBUG ] deploying mgr bootstrap to ceph-node1
[ceph-node1][DEBUG ] write cluster configuration to /etc/ceph/{cluster}.conf
[ceph-node1][WARNIN] mgr keyring does not exist yet, creating one
[ceph-node1][DEBUG ] create a keyring file
[ceph-node1][DEBUG ] create path recursively if it doesn't exist
[ceph-node1][INFO  ] Running command: sudo ceph --cluster ceph --name client.bootstrap-mgr --keyring /var/lib/ceph/bootstrap-mgr/ceph.keyring auth get-or-create mgr.ceph-node1 mon allow profile mgr osd allow * mds allow * -o /var/lib/ceph/mgr/ceph-ceph-node1/keyring
[ceph-node1][INFO  ] Running command: sudo systemctl enable ceph-mgr@ceph-node1
[ceph-node1][WARNIN] Created symlink /etc/systemd/system/ceph-mgr.target.wants/ceph-mgr@ceph-node1.service → /lib/systemd/system/ceph-mgr@.service.
[ceph-node1][INFO  ] Running command: sudo systemctl start ceph-mgr@ceph-node1
[ceph-node1][INFO  ] Running command: sudo systemctl enable ceph.target
在 mgr 节点验证存在 ceph-mgr 进程:
cephadmin@ceph-node1:~/ceph-cluster$ ps uax | grep ceph-mgr | grep grep -v
ceph      17277  4.0 15.2 1197024 307296 ?      Ssl  10:59   0:04 /usr/bin/ceph-mgr -f --cluster ceph --id ceph-node1 --setuser ceph --setgroup ceph
查看集群状态会发现多了一个 mgr 节点:
cephadmin@ceph-node1:~/ceph-cluster$ ceph -s
  cluster:
    id:     2a71ed03-5918-4126-a2ec-8fd8ac173627
    health: HEALTH_WARN
            mon is allowing insecure global_id reclaim
            OSD count 0 < osd_pool_default_size 3

  services:
    mon: 1 daemons, quorum ceph-node1 (age 51m)
    mgr: ceph-node1(active, since 37s)
    osd: 0 osds: 0 up, 0 in

  data:
    pools:   0 pools, 0 pgs
    objects: 0 objects, 0 B
    usage:   0 B used, 0 B / 0 B avail
    pgs:
初始化 node 节点
将 ceph-node1、ceph-node2、ceph-node3 初始化为 node 节点:
cephadmin@ceph-node1:~$ ceph-deploy install --release pacific --no-adjust-repos --nogpgcheck ceph-node1 ceph-node2 ceph-node3
这一步执行完后每个 node 节点上都会有一个 ceph-volume 命令:
cephadmin@ceph-node1:~$ which ceph-volume
/usr/sbin/ceph-volume

cephadmin@ceph-node2:~$ which ceph-volume
/usr/sbin/ceph-volume

cephadmin@ceph-node3:~$ which ceph-volume
/usr/sbin/ceph-volume
解决安全警告
现在我们通过 ceph -s 查看 Ceph 集群状态会看到有如下两个警告:
            mon is allowing insecure global_id reclaim
            OSD count 0 < osd_pool_default_size 3
第一个警告(允许非安全 global_id 回收)可以通过如下命令修改参数解决:
cephadmin@ceph-node1:~$ ceph config set mon auth_allow_insecure_global_id_reclaim false
第二个警告(集群中 OSD 数量少于 3 个)暂时可以忽略,这是因为我们集群中还没有添加 OSD。
初始化 OSD
列出各 node 节点上的硬盘:
cephadmin@ceph-node1:~/ceph-cluster$ ceph-deploy disk list ceph-node1 ceph-node2 ceph-node3
[ceph_deploy.conf][DEBUG ] found configuration file at: /home/cephadmin/.cephdeploy.conf
[ceph_deploy.cli][INFO  ] Invoked (2.0.1): /usr/bin/ceph-deploy disk list ceph-node1 ceph-node2 ceph-node3
[ceph_deploy.cli][INFO  ] ceph-deploy options:
[ceph_deploy.cli][INFO  ]  username                      : None
[ceph_deploy.cli][INFO  ]  verbose                       : False
[ceph_deploy.cli][INFO  ]  debug                         : False
[ceph_deploy.cli][INFO  ]  overwrite_conf                : False
[ceph_deploy.cli][INFO  ]  subcommand                    : list
[ceph_deploy.cli][INFO  ]  quiet                         : False
[ceph_deploy.cli][INFO  ]  cd_conf                       : <ceph_deploy.conf.cephdeploy.Conf instance at 0x7f34b1cb64b0>
[ceph_deploy.cli][INFO  ]  cluster                       : ceph
[ceph_deploy.cli][INFO  ]  host                          : ['ceph-node1', 'ceph-node2', 'ceph-node3']
[ceph_deploy.cli][INFO  ]  func                          : <function disk at 0x7f34b1c8e2d0>
[ceph_deploy.cli][INFO  ]  ceph_conf                     : None
[ceph_deploy.cli][INFO  ]  default_release               : False
[ceph-node1][DEBUG ] connection detected need for sudo
[ceph-node1][DEBUG ] connected to host: ceph-node1
[ceph-node1][DEBUG ] detect platform information from remote host
[ceph-node1][DEBUG ] detect machine type
[ceph-node1][DEBUG ] find the location of an executable
[ceph-node1][INFO  ] Running command: sudo fdisk -l
[ceph-node1][INFO  ] Disk /dev/sda: 20 GiB, 21474836480 bytes, 41943040 sectors
[ceph-node1][INFO  ] Disk /dev/sdb: 20 GiB, 21474836480 bytes, 41943040 sectors
[ceph-node1][INFO  ] Disk /dev/sdc: 20 GiB, 21474836480 bytes, 41943040 sectors
[ceph-node1][INFO  ] Disk /dev/sdd: 20 GiB, 21474836480 bytes, 41943040 sectors
[ceph-node1][INFO  ] Disk /dev/mapper/ubuntu--vg-ubuntu--lv: 19 GiB, 20396900352 bytes, 39837696 sectors
[ceph-node2][DEBUG ] connection detected need for sudo
[ceph-node2][DEBUG ] connected to host: ceph-node2
[ceph-node2][DEBUG ] detect platform information from remote host
[ceph-node2][DEBUG ] detect machine type
[ceph-node2][DEBUG ] find the location of an executable
[ceph-node2][INFO  ] Running command: sudo fdisk -l
[ceph-node2][INFO  ] Disk /dev/sda: 20 GiB, 21474836480 bytes, 41943040 sectors
[ceph-node2][INFO  ] Disk /dev/sdb: 20 GiB, 21474836480 bytes, 41943040 sectors
[ceph-node2][INFO  ] Disk /dev/sdc: 20 GiB, 21474836480 bytes, 41943040 sectors
[ceph-node2][INFO  ] Disk /dev/sdd: 20 GiB, 21474836480 bytes, 41943040 sectors
[ceph-node2][INFO  ] Disk /dev/mapper/ubuntu--vg-ubuntu--lv: 19 GiB, 20396900352 bytes, 39837696 sectors
[ceph-node3][DEBUG ] connection detected need for sudo
[ceph-node3][DEBUG ] connected to host: ceph-node3
[ceph-node3][DEBUG ] detect platform information from remote host
[ceph-node3][DEBUG ] detect machine type
[ceph-node3][DEBUG ] find the location of an executable
[ceph-node3][INFO  ] Running command: sudo fdisk -l
[ceph-node3][INFO  ] Disk /dev/sda: 20 GiB, 21474836480 bytes, 41943040 sectors
[ceph-node3][INFO  ] Disk /dev/sdb: 20 GiB, 21474836480 bytes, 41943040 sectors
[ceph-node3][INFO  ] Disk /dev/sdc: 20 GiB, 21474836480 bytes, 41943040 sectors
[ceph-node3][INFO  ] Disk /dev/sdd: 20 GiB, 21474836480 bytes, 41943040 sectors
[ceph-node3][INFO  ] Disk /dev/mapper/ubuntu--vg-ubuntu--lv: 19 GiB, 20396900352 bytes, 39837696 sectors
可以看到每个 node 节点上都有 4 块容量为 20GB 的硬盘,/dev/sda 设备对应的硬盘为系统盘,而 /dev/sdb、/dev/sdc、/dev/sdd 就是我这里专门用来创建 OSD 的数据盘了。
擦除每个 node 节点上的数据盘:
cephadmin@ceph-node1:~/ceph-cluster$ ceph-deploy disk zap ceph-node1 /dev/sdb /dev/sdc /dev/sdd
cephadmin@ceph-node1:~/ceph-cluster$ ceph-deploy disk zap ceph-node2 /dev/sdb /dev/sdc /dev/sdd
cephadmin@ceph-node1:~/ceph-cluster$ ceph-deploy disk zap ceph-node3 /dev/sdb /dev/sdc /dev/sdd
添加 OSD:
$ ceph-deploy osd create ceph-node1 --data /dev/sdb
$ ceph-deploy osd create ceph-node1 --data /dev/sdc
$ ceph-deploy osd create ceph-node1 --data /dev/sdd
$ ceph-deploy osd create ceph-node2 --data /dev/sdb
$ ceph-deploy osd create ceph-node2 --data /dev/sdc
$ ceph-deploy osd create ceph-node2 --data /dev/sdd
$ ceph-deploy osd create ceph-node3 --data /dev/sdb
$ ceph-deploy osd create ceph-node3 --data /dev/sdc
$ ceph-deploy osd create ceph-node3 --data /dev/sdd
对于 bluestore 来说,我们还可以通过如下方式来分别指定 Ceph 的对象数据、rocks DB 的元数据、数据库的 wal 日志(预写日志)保存到不同设备:
# --data 指定对象数据保存位置
# --block-db 指定 rocks DB 元数据保存位置
# --block-wal 指定 数据库 wal 日志保存位置
$ ceph-deploy osd --help
 ceph-deploy osd create {node} --data /path/to/data --block-db /path/to/db-device
 ceph-deploy osd create {node} --data /path/to/data --block-wal /path/to/wal-device
 ceph-deploy osd create {node} --data /path/to/data --block-db /path/to/db-device --block-wal /path/to/wal-device
默认仅指定
--data时这三类数据都放到同一块硬盘。当机器存在多类硬盘时推荐使用如下方案:
如果机器有 SSD 和机械两类硬盘,那么可以将 rocks DB 元数据和 wal 日志保存到 SSD,对象数据保存到机械盘。
如果机器有 NVME、SSD 和机械三类硬盘,那么可以将 rocks DB 元数据保存到 NVME 硬盘,wal 日志保存到 SSD,对象数据保存到机械盘。
执行完上述命令后此时每个 node 节点都会有 3 个 OSD 进程:
cephadmin@ceph-node1:~$ ps aux | grep osd
ceph       22118  0.3  3.0 1030092 62076 ?       Ssl  12:33   0:03 /usr/bin/ceph-osd -f --cluster ceph --id 0 --setuser ceph --setgroup ceph
ceph       23720  0.3  3.1 1030080 62576 ?       Ssl  12:34   0:03 /usr/bin/ceph-osd -f --cluster ceph --id 1 --setuser ceph --setgroup ceph
ceph       25262  0.3  3.0 1030084 62516 ?       Ssl  12:35   0:03 /usr/bin/ceph-osd -f --cluster ceph --id 2 --setuser ceph --setgroup ceph

cephadmin@ceph-node2:~$ ps uax | grep osd
ceph       14656  0.4  3.1 1030084 64100 ?       Ssl  12:35   0:04 /usr/bin/ceph-osd -f --cluster ceph --id 3 --setuser ceph --setgroup ceph
ceph       16388  0.3  3.1 997320 63400 ?        Ssl  12:36   0:03 /usr/bin/ceph-osd -f --cluster ceph --id 4 --setuser ceph --setgroup ceph
ceph       18118  0.3  3.1 998336 63476 ?        Ssl  12:36   0:03 /usr/bin/ceph-osd -f --cluster ceph --id 5 --setuser ceph --setgroup ceph

cephadmin@ceph-node3:~$ ps aux | grep osd
ceph       21727  0.3  3.0 1031108 61972 ?       Ssl  12:36   0:03 /usr/bin/ceph-osd -f --cluster ceph --id 6 --setuser ceph --setgroup ceph
ceph       23471  0.4  3.0 1030088 61456 ?       Ssl  12:37   0:03 /usr/bin/ceph-osd -f --cluster ceph --id 7 --setuser ceph --setgroup ceph
ceph       25229  0.3  3.1 964544 63232 ?        Ssl  12:37   0:03 /usr/bin/ceph-osd -f --cluster ceph --id 8 --setuser ceph --setgroup ceph
可以看到每个 OSD 进程对应一个 OSD ID,OSD ID 索引从 0 开始。
此时查看集群状态就是正常的了:
cephadmin@ceph-node1:~$ ceph -s
  cluster:
    id:     2a71ed03-5918-4126-a2ec-8fd8ac173627
    health: HEALTH_OK

  services:
    mon: 1 daemons, quorum ceph-node1 (age 2h)
    mgr: ceph-node1(active, since 114m)
    osd: 9 osds: 9 up (since 16m), 9 in (since 16m)

  data:
    pools:   1 pools, 1 pgs
    objects: 0 objects, 0 B
    usage:   52 MiB used, 180 GiB / 180 GiB avail
    pgs:     1 active+clean
可以查看各 OSD 和各 node 节点的对应关系:
cephadmin@ceph-node1:~$ ceph osd tree
ID  CLASS  WEIGHT   TYPE NAME            STATUS  REWEIGHT  PRI-AFF
-1         0.17537  root default
-3         0.05846      host ceph-node1
 0    hdd  0.01949          osd.0            up   1.00000  1.00000
 1    hdd  0.01949          osd.1            up   1.00000  1.00000
 2    hdd  0.01949          osd.2            up   1.00000  1.00000
-5         0.05846      host ceph-node2
 3    hdd  0.01949          osd.3            up   1.00000  1.00000
 4    hdd  0.01949          osd.4            up   1.00000  1.00000
 5    hdd  0.01949          osd.5            up   1.00000  1.00000
-7         0.05846      host ceph-node3
 6    hdd  0.01949          osd.6            up   1.00000  1.00000
 7    hdd  0.01949          osd.7            up   1.00000  1.00000
 8    hdd  0.01949          osd.8            up   1.00000  1.00000
测试上传下载文件
为验证集群功能是否正常,我们可以先测试一下上传和下载功能是否正常。
存取数据时,客户端必须首先连接至 RADOS 集群上某存储池,然后根据对象名称由相关的 CRUSH 规则完成数据对象寻址。
创建存储池
这里首先创建一个用于测试的存储池 mypool,并设定其 PG 数量为 32 个。
cephadmin@ceph-node1:~$ ceph osd pool create mypool 32 32
pool 'mypool' created
# 查看存储池列表,也可使用 rados lspools
cephadmin@ceph-node1:~$ ceph osd pool ls
device_health_metrics
mypool
查看 mypool 中的 PG 和 PGP:
cephadmin@ceph-node1:~$ ceph pg ls-by-pool mypool | awk '{print $1,$2,$15}'
PG OBJECTS ACTING
2.0 0 [3,6,0]p3
2.1 0 [2,6,3]p2
2.2 0 [5,1,8]p5
2.3 0 [5,2,8]p5
2.4 0 [1,7,3]p1
2.5 0 [8,0,4]p8
2.6 0 [1,6,3]p1
2.7 0 [3,7,2]p3
2.8 0 [3,7,0]p3
2.9 0 [1,4,8]p1
2.a 0 [6,1,3]p6
2.b 0 [8,5,2]p8
2.c 0 [6,0,5]p6
2.d 0 [6,3,2]p6
2.e 0 [2,8,3]p2
2.f 0 [8,4,0]p8
2.10 0 [8,1,5]p8
2.11 0 [4,1,8]p4
2.12 0 [7,1,3]p7
2.13 0 [7,4,2]p7
2.14 0 [3,7,0]p3
2.15 0 [7,1,3]p7
2.16 0 [5,7,1]p5
2.17 0 [5,6,2]p5
2.18 0 [8,4,2]p8
2.19 0 [0,4,7]p0
2.1a 0 [3,8,2]p3
2.1b 0 [6,5,2]p6
2.1c 0 [8,4,1]p8
2.1d 0 [7,3,0]p7
2.1e 0 [2,7,5]p2
2.1f 0 [0,3,8]p0

* NOTE: afterwards
如上输出结果表示有 32 个 PG 和 32 个 PGP,以 2.0 0 [3,6,0]p3 为例,它表示编号为 2 的存储池(在这里也就是 mypool)的 0 号 PG 中保存了 0 个对象,该 PG 映射到了 ID 分别为 3、6、0 的 OSD,且在这个 PG 中 ID 为 3 的 OSD 是主 OSD。
32 个 PG 是存储池的属性(我们可以说某个存储池有 n 个 PG),表示如果数据往这个存储池写时可以被拆分成 32 份写到每个 PG,单个 PG 表示的是单份数据映射到哪几个 OSD,而 32 个 PGP 表示的是一个存储池中有 32 种 OSD 组合关系来构成 PG。
上传文件
当前的 Ceph 环境还没还没有部署块存储和文件系统,也没有使用对象存储的客户端,但是 Ceph 的 rados 命令本身就可以实现访问 Ceph 对象存储的功能。下面我测试上传 /var/log/lastlog 到 mypool 存储池,测试的文件大小最好大于 4MB:
# 上传 /var/log/lastlog 到 mypool 存储池,在存储池中将该文件命名为 log1
cephadmin@ceph-node1:~$ rados put log1 /var/log/lastlog --pool=mypool
查看 mypool 存储池中的文件:
cephadmin@ceph-node1:~$ rados ls --pool=mypool
log1·
查看 log1 文件的存储结构:
cephadmin@ceph-node1:~$ ceph osd map mypool log1
osdmap e63 pool 'mypool' (2) object 'log1' -> pg 2.4b08e9d6 (2.16) -> up ([5,7,1], p5) acting ([5,7,1], p5)
上述输出表示 log1 被拆分为 2 个 object 保存到了 ID 为 2 的存储池(也就是 mypool)的 16 号 PG。
下载文件
从 mypool 存储池中下载 log1 文件保存到 ~/lastlog.txt:
cephadmin@ceph-node1:~$ rados get log1 --pool=mypool ~/lastlog.txt
修改文件
如果要修改数据,直接再 put 一次存储池中同名的文件即可:
cephadmin@ceph-node1:~$ rados put log1 /etc/passwd --pool=mypool
删除文件
删除时直接指定存储池中文件名称:
cephadmin@ceph-node1:~$ rados ls --pool=mypool
log1

cephadmin@ceph-node1:~$ rados rm log1 --pool=mypool
高可用 mon 节点
为演示 mon 节点的后期扩展操作,在前面初始化 mon 节点时我仅仅初始化 ceph-node1 为 mon 节点了,现在我们要将 ceph-node2 和 ceph-node3 也添加为 mon 节点。
如前面初始化 mon 节点时相同,首先需要在准备添加为 mon 节点的主机安装如下包:
$ apt install python2.7 ceph-mon -y
$ ln -sv /usr/bin/python2.7 /usr/bin/python2
查看当前 Ceph 集群的 mon 节点:
cephadmin@ceph-node1:~$ ceph -s | grep mon
    mon: 1 daemons, quorum ceph-node1 (age 8h)
执行添加操作将 ceph-node2 和 ceph-node3 添加为 mon 节点:
cephadmin@ceph-node1:~/ceph-cluster$ ceph-deploy mon add ceph-node2
cephadmin@ceph-node1:~/ceph-cluster$ ceph-deploy mon add ceph-node3
再次查看 Ceph 集群的 mon 节点:
cephadmin@ceph-node1:~/ceph-cluster$ ceph -s | grep mon
    mon: 3 daemons, quorum ceph-node1,ceph-node2,ceph-node3 (age 69s)
可以看到已经 ceph-node1、ceph-node2、ceph-node3 已经都为 mon 节点了。
查看 mon 节点状态:
cephadmin@ceph-node1:~/ceph-cluster$  ceph quorum_status --format json-pretty

{
    "election_epoch": 12,
    "quorum": [
        0,
        1,
        2
    ],
    "quorum_names": [
        "ceph-node1",
        "ceph-node2",
        "ceph-node3"
    ],
    "quorum_leader_name": "ceph-node1",
    "quorum_age": 238,
    "features": {
        "quorum_con": "4540138297136906239",
        "quorum_mon": [
            "kraken",
            "luminous",
            "mimic",
            "osdmap-prune",
            "nautilus",
            "octopus",
            "pacific",
            "elector-pinging"
        ]
    },
    "monmap": {
        "epoch": 3,
        "fsid": "2a71ed03-5918-4126-a2ec-8fd8ac173627",
        "modified": "2021-09-15T06:37:33.972331Z",
        "created": "2021-09-14T10:07:58.734879Z",
        "min_mon_release": 16,
        "min_mon_release_name": "pacific",
        "election_strategy": 1,
        "disallowed_leaders: ": "",
        "stretch_mode": false,
        "features": {
            "persistent": [
                "kraken",
                "luminous",
                "mimic",
                "osdmap-prune",
                "nautilus",
                "octopus",
                "pacific",
                "elector-pinging"
            ],
            "optional": []
        },
        "mons": [
            {
                "rank": 0,
                "name": "ceph-node1",
                "public_addrs": {
                    "addrvec": [
                        {
                            "type": "v2",
                            "addr": "172.20.0.21:3300",
                            "nonce": 0
                        },
                        {
                            "type": "v1",
                            "addr": "172.20.0.21:6789",
                            "nonce": 0
                        }
                    ]
                },
                "addr": "172.20.0.21:6789/0",
                "public_addr": "172.20.0.21:6789/0",
                "priority": 0,
                "weight": 0,
                "crush_location": "{}"
            },
            {
                "rank": 1,
                "name": "ceph-node2",
                "public_addrs": {
                    "addrvec": [
                        {
                            "type": "v2",
                            "addr": "172.20.0.22:3300",
                            "nonce": 0
                        },
                        {
                            "type": "v1",
                            "addr": "172.20.0.22:6789",
                            "nonce": 0
                        }
                    ]
                },
                "addr": "172.20.0.22:6789/0",
                "public_addr": "172.20.0.22:6789/0",
                "priority": 0,
                "weight": 0,
                "crush_location": "{}"
            },
            {
                "rank": 2,
                "name": "ceph-node3",
                "public_addrs": {
                    "addrvec": [
                        {
                            "type": "v2",
                            "addr": "172.20.0.23:3300",
                            "nonce": 0
                        },
                        {
                            "type": "v1",
                            "addr": "172.20.0.23:6789",
                            "nonce": 0
                        }
                    ]
                },
                "addr": "172.20.0.23:6789/0",
                "public_addr": "172.20.0.23:6789/0",
                "priority": 0,
                "weight": 0,
                "crush_location": "{}"
            }
        ]
    }
}
上述输出内容包含了当前所有 mon 节点的信息,
quorum_leader_name标识的节点为当前几个 mon 节点中的 leader 节点。
高可用 mgr 节点
我这里继续将 ceph-node2 和 ceph-node3 添加为 mgr 节点,在执行添加操作之前也需要在这两个节点的主机安装相关软件包:
cephadmin@ceph-node2:~$ sudo apt install ceph-mgr -y
cephadmin@ceph-node3:~$ sudo apt install ceph-mgr -y
执行添加操作:
cephadmin@ceph-node1:~/ceph-cluster$ ceph-deploy mgr create ceph-node2
cephadmin@ceph-node1:~/ceph-cluster$ ceph-deploy mgr create ceph-node3
查看 mgr 节点状态:
cephadmin@ceph-node1:~/ceph-cluster$ ceph -s  | grep mgr
    mgr: ceph-node1(active, since 19h), standbys: ceph-node2, ceph-node3
可以看到,ceph-node1 作为的 mgr 节点处于激活状态,而 ceph-node2 和 ceph-node3 作为的 mgr 节点处于备选状态。
部署 Ceph 集群的其它方式:
- ceph-ansible: https://github.com/ceph/ceph-ansible
- ceph-salt: https://github.com/ceph/ceph-salt
- ceph-container: https://github.com/ceph/ceph-container
- ceph-chef: https://github.com/ceph/ceph-chef
- cephadm(ceph 官方在 ceph 15 版本加入的部署工具): https://docs.ceph.com/en/latest/cephadm
- ceph-deploy: https://github.com/ceph/ceph-deploy
评论区